

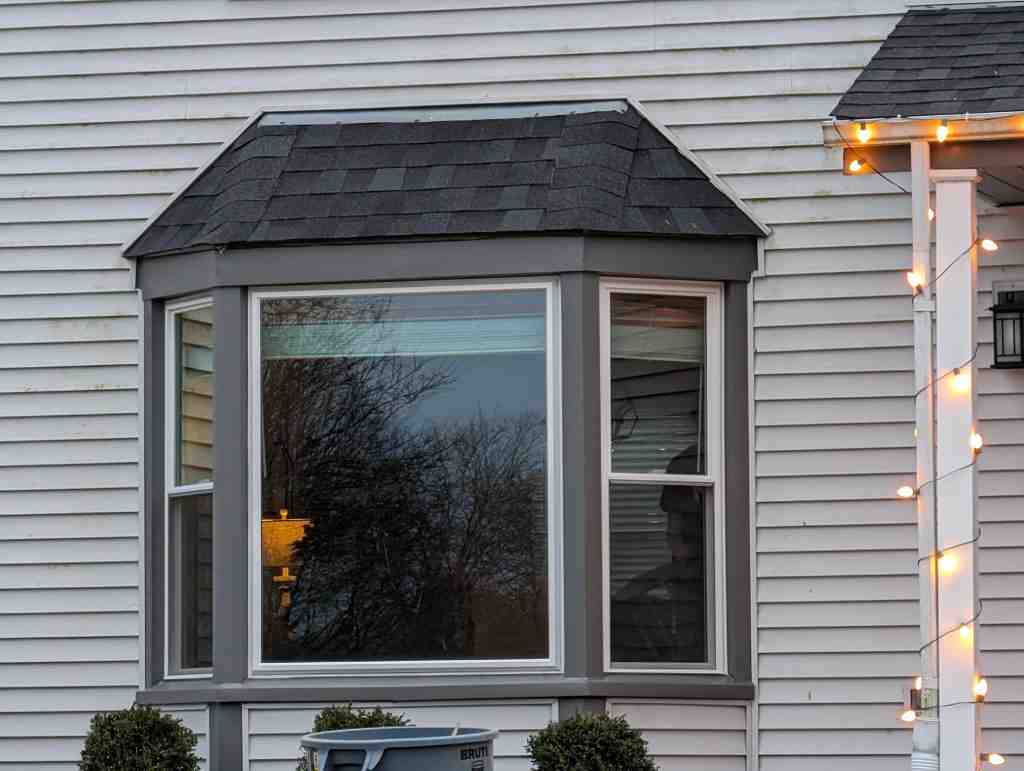
Bay Window Construction Details That Matter Most
Bay window construction details start with support, drainage, and insulation. The wall opening and projecting window need framing that can carry the load. The sill must be level and able to drain outward. Flashing must guide water over the building wrap and away from the roof and window joints. Finally, air sealing and insulation beneath the bay help prevent drafts and cold floors.
I’m Voytek Glab, owner of Perfect Windows & Siding. In more than 20 years of window installation and exterior remodeling across Chicagoland, I’ve learned why these bay window construction details matter as much as the window itself.
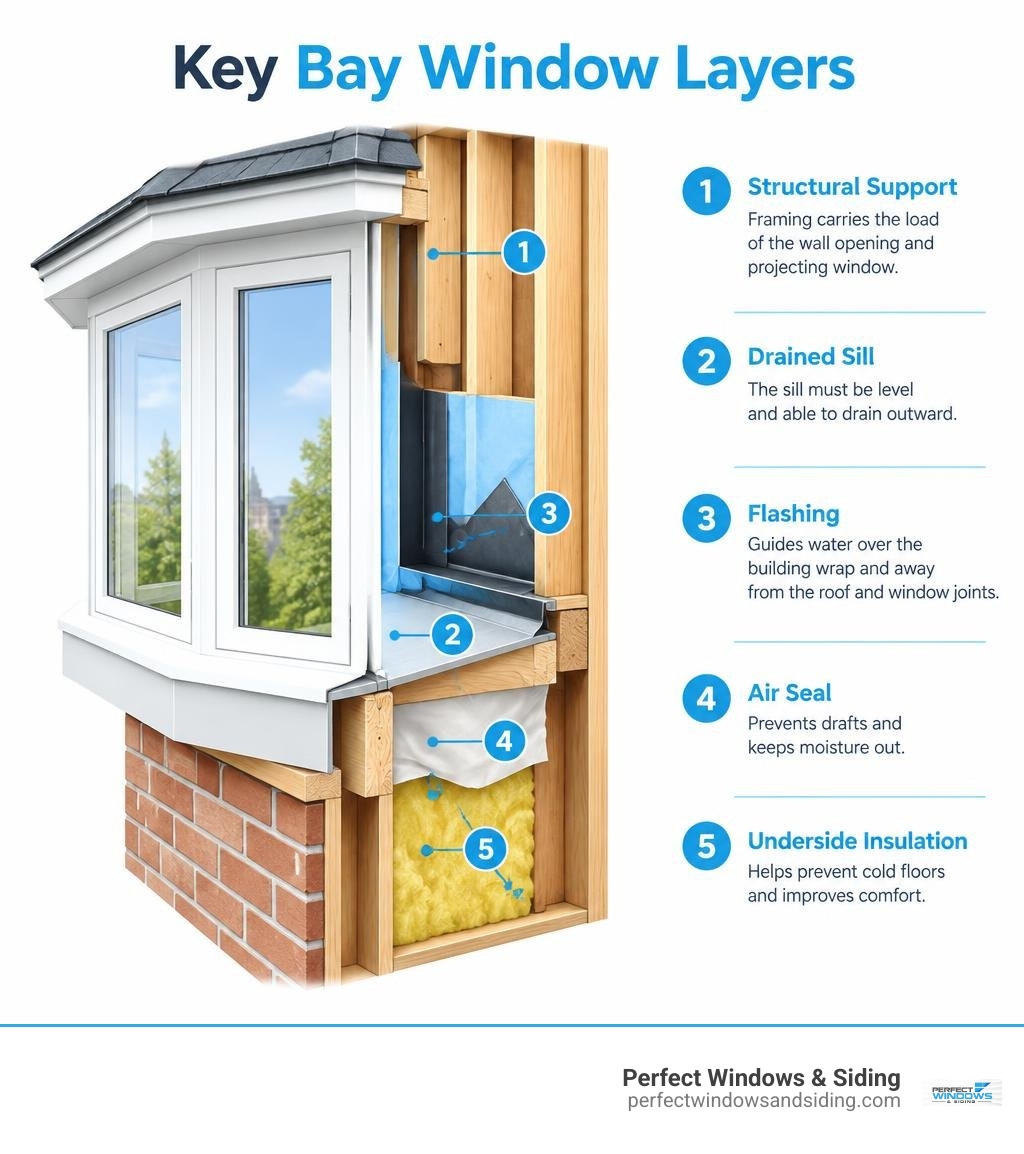
Relevant articles related to bay window construction details:
Essential Bay Window Construction Details: Framing and Structural Support
A bay window transforms any room by drawing in natural light from multiple angles, but because the structure hangs outside the exterior wall plane, its framing requires meticulous care. Structural stability starts with understanding the dynamic loads placed on the exterior envelope. Unlike standard flat windows, bay assemblies project outward, creating continuous cantilever forces that pull at the top framing and press into the lower structure.
When engineers design framing for projecting assemblies, structural framing requires proper headers and a solid base. Reviewing our technical guide on mastering the bay window section detail helps clarify how load-bearing headers distribute weight around the opening. For new builds or extensive retrofits, framing typically utilizes structural 2×6 lumber to support the cantilevered projection, ensuring the structure resists sagging over decades of exposure to Midwest weather. Builders often reference guides on building a cantilever for a bay window to establish the right balance between interior floor joist tie-ins and exterior overhangs.
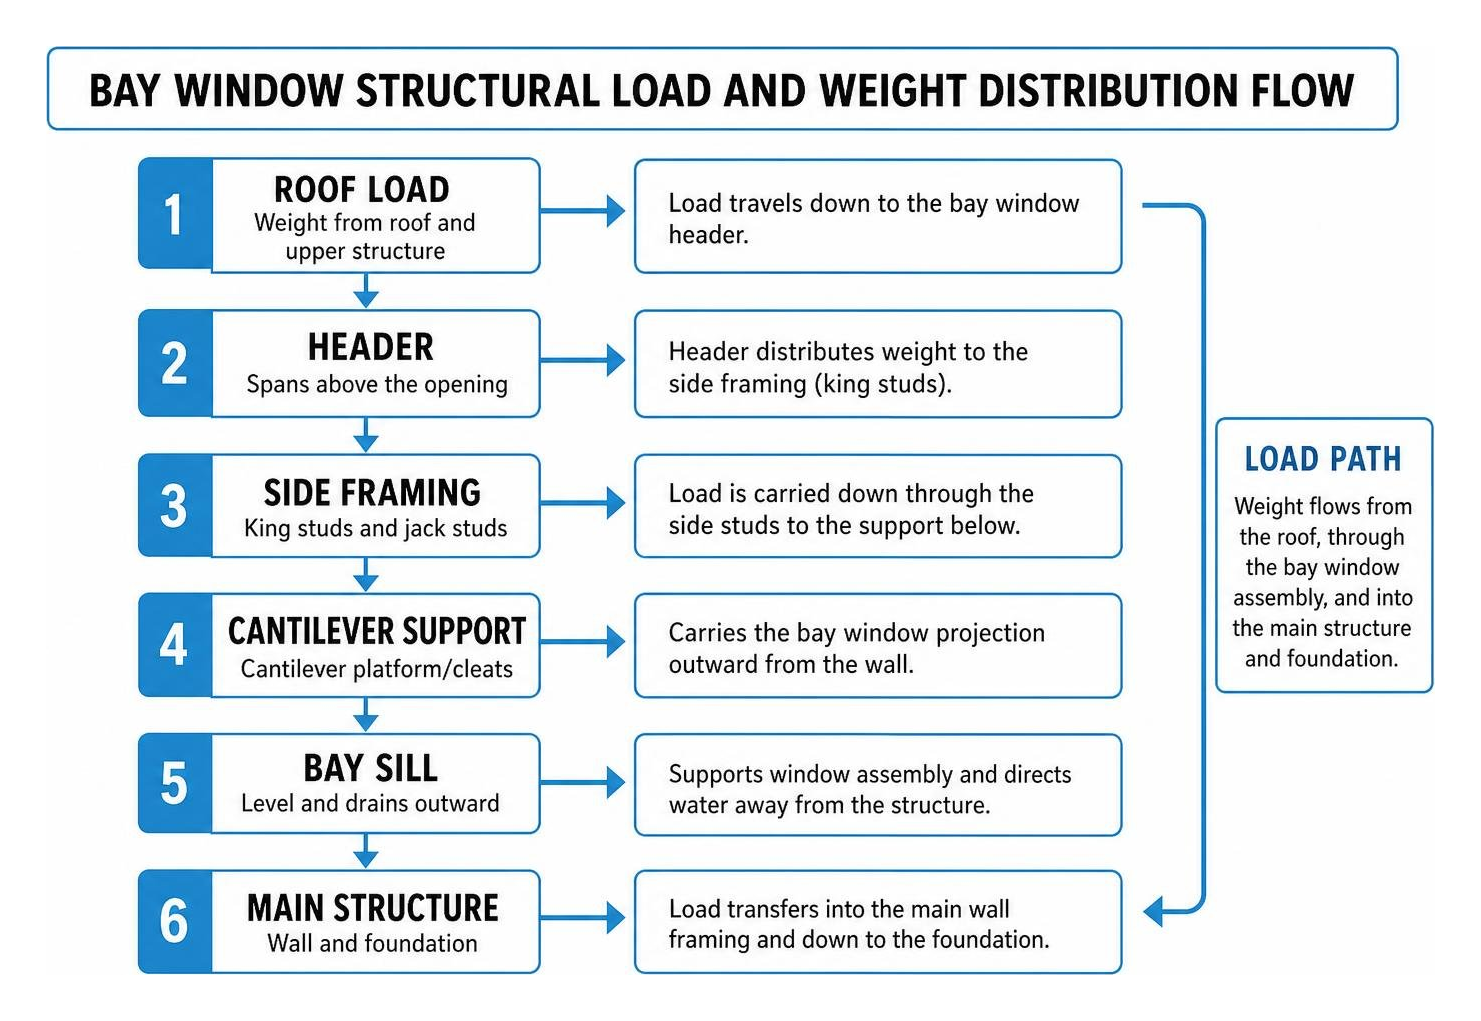
Cantilever and Rough Opening Bay Window Construction Details
Framing precision is crucial when preparing the rough opening. A rough opening must be sized 1/2 inch larger than the overall window frame in both width and height to allow for proper plumbing, leveling, and thermal expansion. The framing must meet strict tolerances: no more than 1/8 inch total deviation across the diagonal, plumb, and level lines.
When establishing the cantilever platform, secure structural cleats directly into the wall studs using heavy-duty corrosion-resistant fasteners. Use a framing square to verify that the support projection aligns perfectly with the window angle.
| Specification | 30-Degree Bay Window | 45-Degree Bay Window |
|---|---|---|
| Typical Width Range | 4’6″ to 12’1″ (137 to 368 cm) | 5’0″ to 14’0″ (152 to 427 cm) |
| Typical Height Range | 2’2″ to 6’2″ (66 to 188 cm) | 2’6″ to 6’6″ (76 to 198 cm) |
| Projection Depth | 1’2″ to 2’0″ (35.6 to 61 cm) | 1’6″ to 2’6″ (45.7 to 76 cm) |
| Framing Lumber Standard | 2×6 framing members with 1/2″ exterior plywood | 2×6 framing members with 1/2″ exterior plywood |
| Side Angle Splays | 30° from exterior wall plane | 45° from exterior wall plane |
| Ideal Floor Plan Fit | Narrow setbacks, compact rooms | Deep projections, expansive alcoves |
Temporary Supports and Solo Installation Logistics
Bay windows are heavy, complex assemblies. While working with a professional crew is ideal, knowing how to safely handle and support these units during installation is critical.
- Lighten the Assembly: Carefully remove the operable side sashes. Removing the glass sashes cuts down the unit’s weight and provides unobstructed access to drive fasteners through the frame jambs.
- Build a Temporary Support: Construct a sturdy T-brace or support frame out of scrap 2×4 framing lumber. Position this brace beneath the cantilever projection to carry the dead load while you align the frame.
- Set Starter Screws: Drive starter screws partially into the framing at the pre-determined shim locations before lifting the main frame into the opening.
- Shim and Fasten: Rest the unit on non-compressible shims along the sill, verify level, and engage the starter fasteners.
Following proven techniques from Fine Homebuilding’s guide to installing a bay window alone and our overview of mastering bay window installation ensures you maintain safety and alignment throughout the process.
Weatherproofing, Water Management, and Flashing Systems
Improper water management causes the vast majority of window failures. Because a bay window extends beyond the primary drainage plane of the home, it faces direct wind-driven rain and snow accumulation.
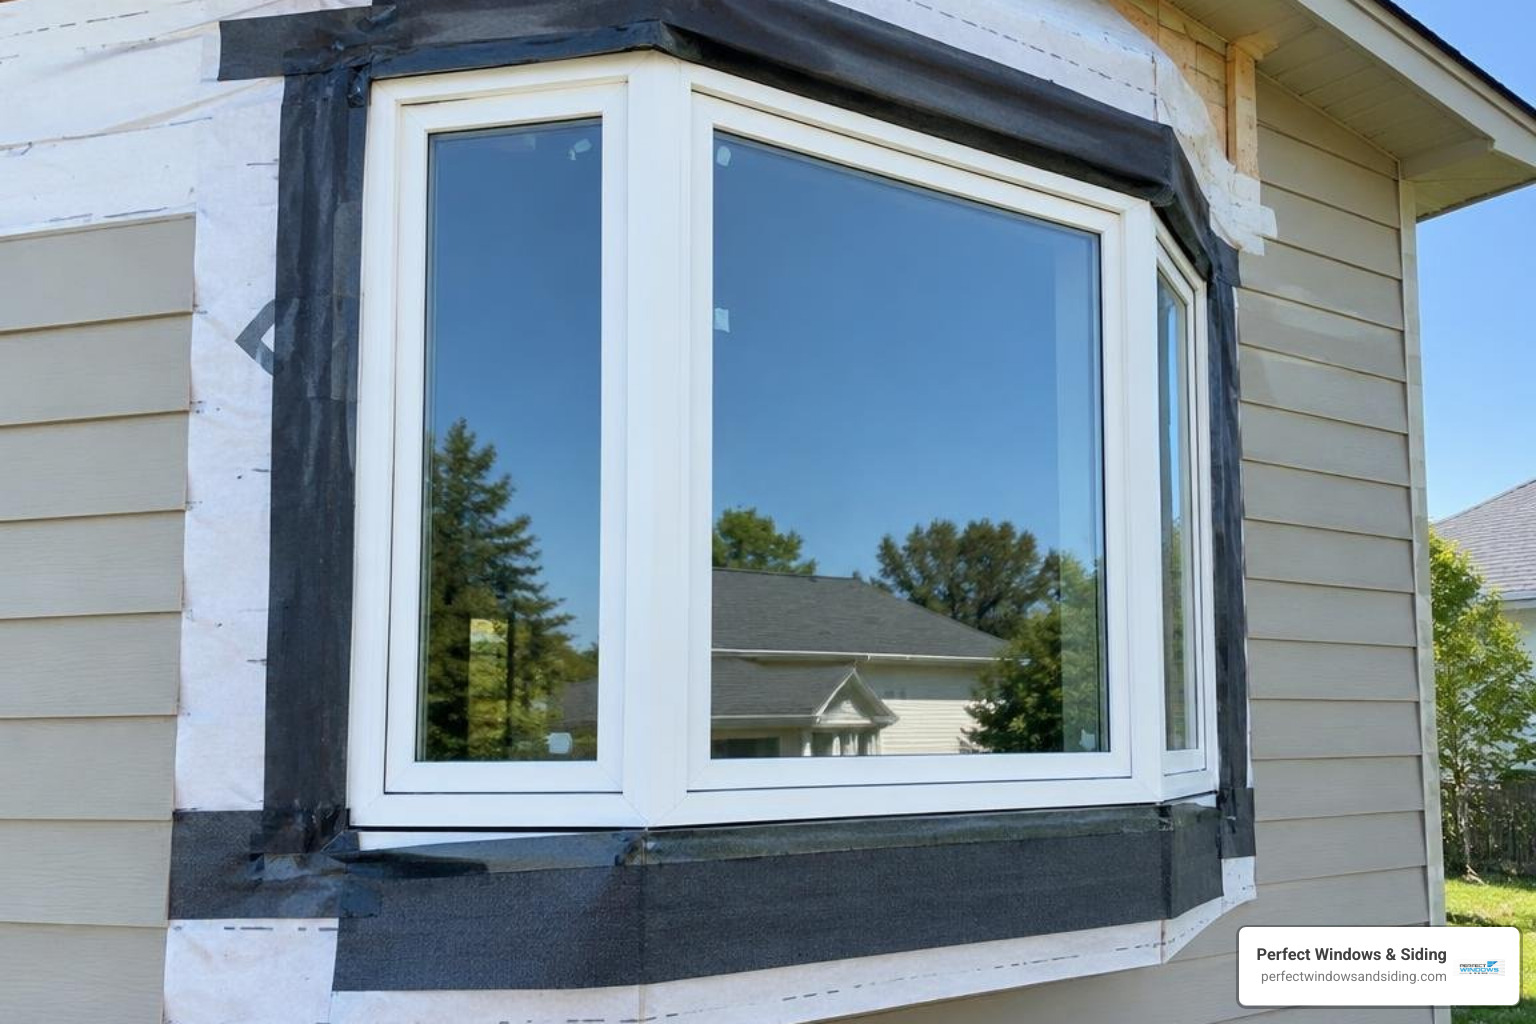
Waterproofing requires a complete shiplap flashing strategy where every upper layer overlaps the lower layer:
- Sill Pan Protection: Begin at the bottom rough sill by applying a self-adhered waterproof membrane that turns up at the interior edge and extends at least 2 inches down over the building wrap below. Ensure the sill pan slopes slightly outward to guide any moisture away from the interior framing.
- Jamb Flashing: Install side flashing membranes extending 1 3/4 inches beyond the window frame, overlapping the sill flashing legs.
- Head Flashing: Lap the head flashing over the top nailing fin, followed by the upper layer of weather-resistive barrier (WRB), taped securely with seam seal tape.
- Continuous Air Seal: On the interior side, apply a continuous 3/8-inch bead of sealant along the frame perimeter combined with low-expansion polyurethane foam to eliminate negative pressure air leaks.
Roof Framing and Flashing Bay Window Construction Details
Unless protected by an existing wide roof overhang, every projecting bay unit requires a dedicated roof structure. A 45-degree hip roof provides excellent shedding capability and adds structural stability to the entire window assembly.
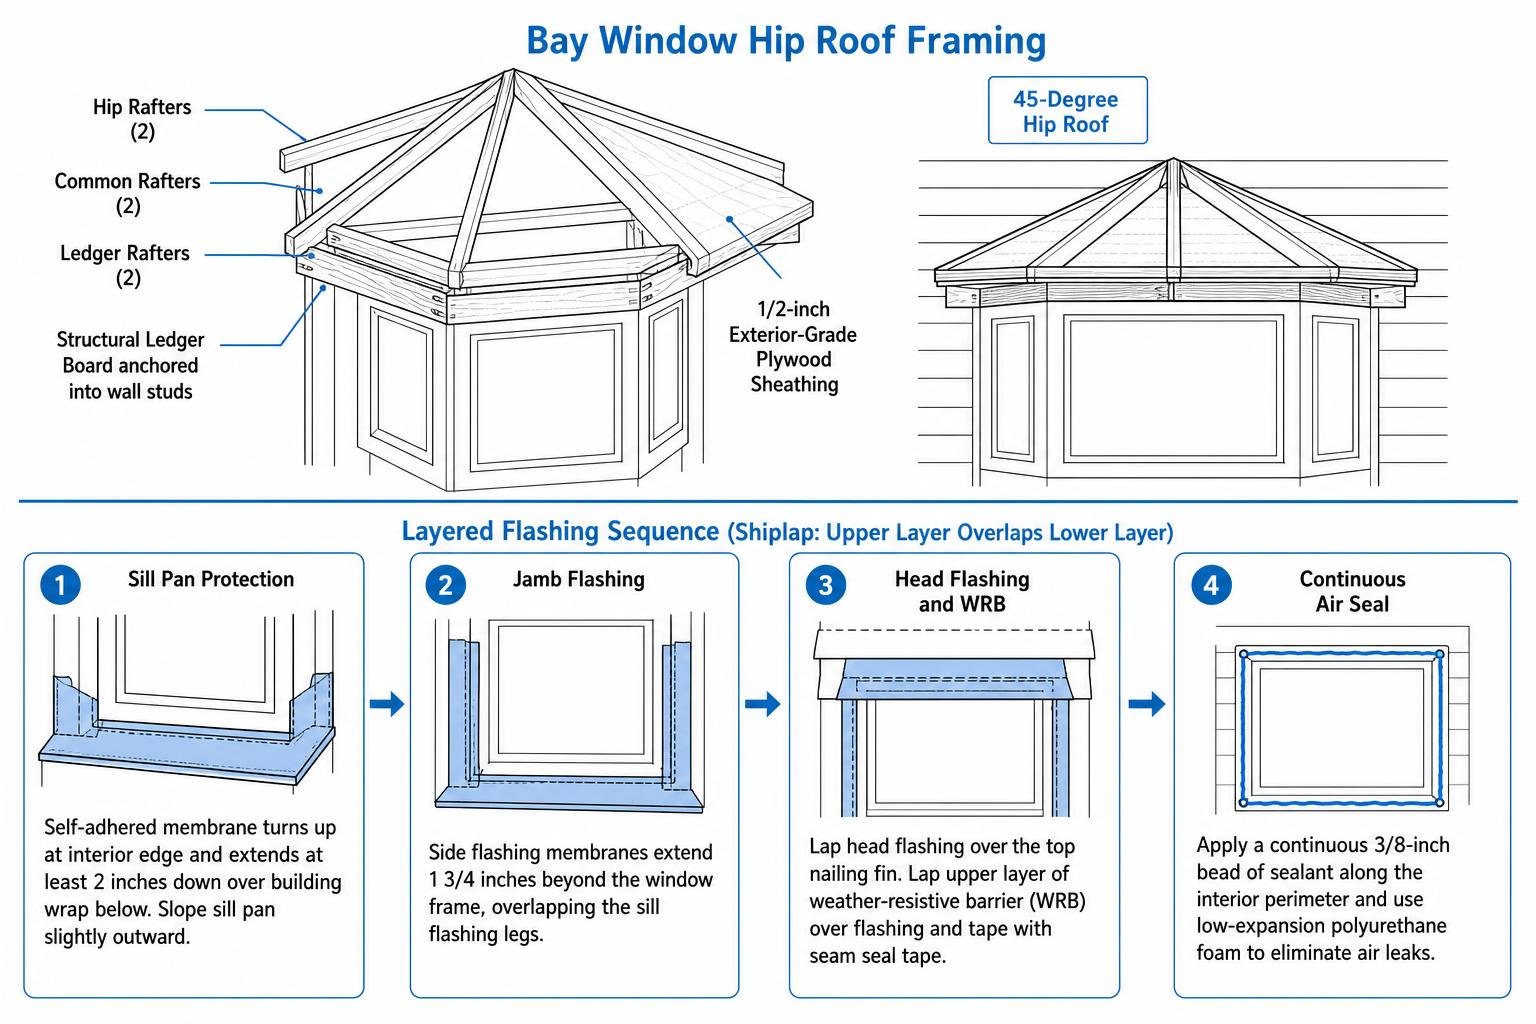
Construct the roof framing using 2×4 rafters attached to a structural ledger board anchored into the house wall studs. Install two common rafters, two ledger rafters, and two hip rafters, sheathed with 1/2-inch exterior-grade plywood.
When rebuilding a bay window structure, apply a full self-adhered ice-and-water barrier over the roof decking, install a corrosion-resistant drip edge, and weave step flashing pieces into each successive course of roofing shingles where the roof meets the exterior wall.
Integrating Exterior Building Wrap, Foam Sheathing, and Siding
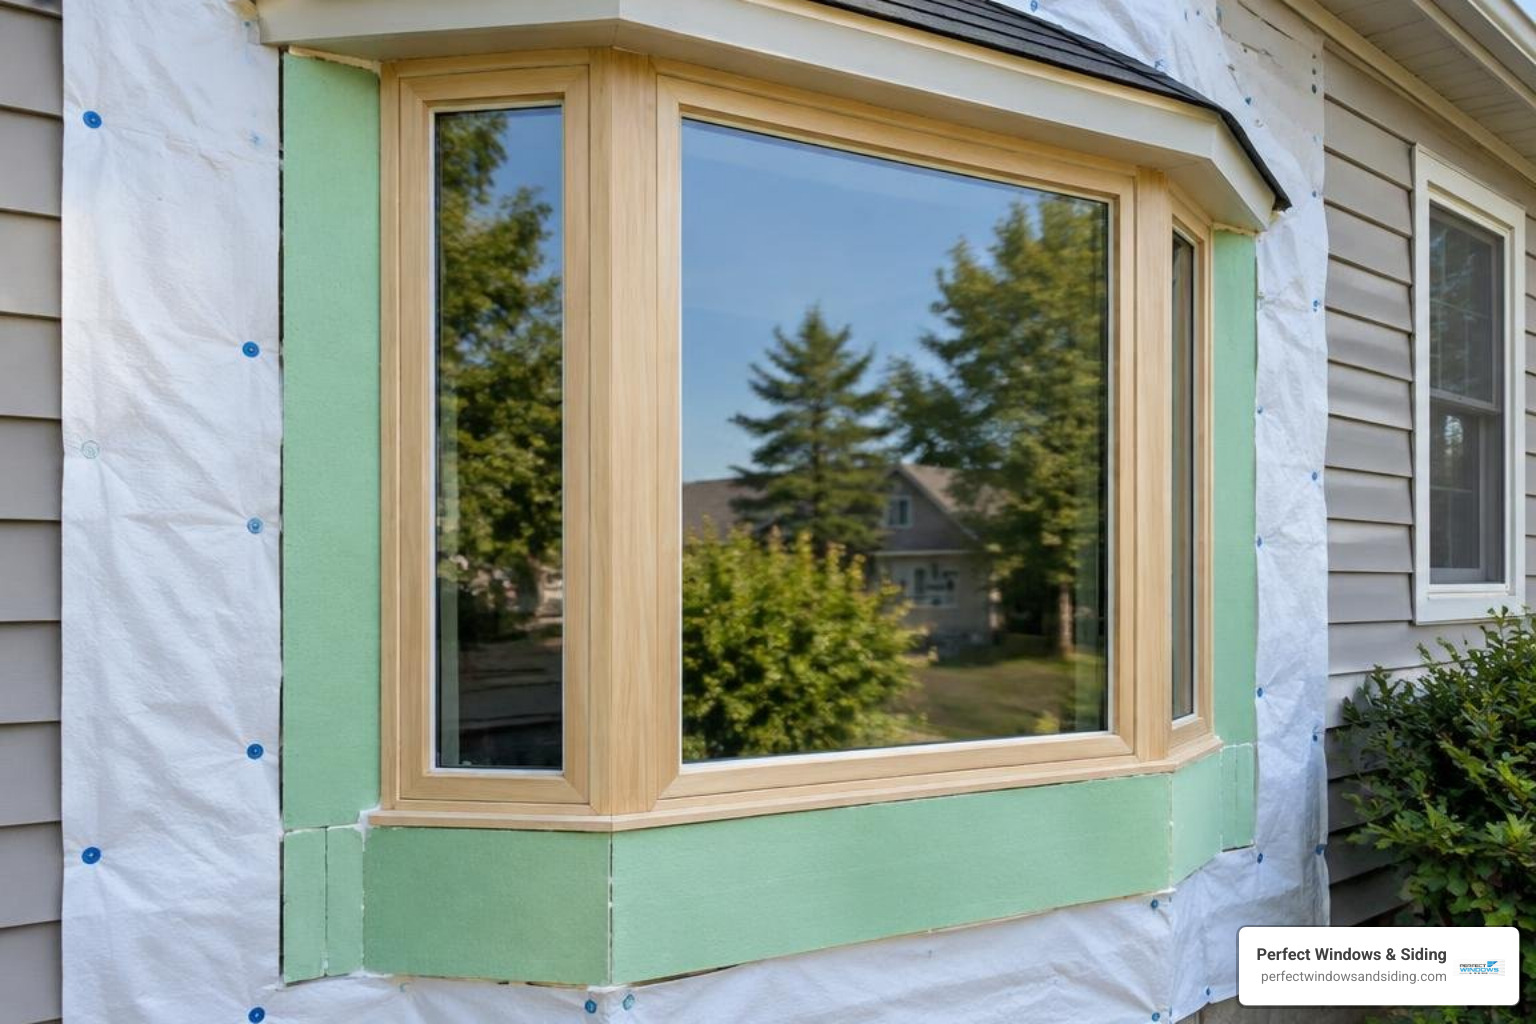
When integrating exterior insulation like continuous rigid foam sheathing, wall thickness increases. Install vertical furring strips over the weather barrier to create a clear 3/8-inch drainage plane and ventilation gap behind the exterior siding. Maintain a clean expansion gap between the window frame and the siding edges, sealed with high-grade elastomeric sealant backed by a closed-cell backer rod.
Insulation and Underside Thermal Envelope Details
Because the bottom of a bay window hangs exposed to the elements, an uninsulated cantilever acts as a giant thermal bridge, drawing heat out of the room and leaving the window seat icy cold in winter.
To build a continuous thermal envelope:
- Air Seal the Subfloor Cavity: Apply closed-cell spray foam along all rim joists and interior perimeter edges of the cantilever framing.
- Install Rigid Insulation: Fit 1 to 2 inches of foil-faced polyisocyanurate or extruded polystyrene (XPS) rigid foam board directly against the bottom subfloor sheathing inside the cantilever framing bays, delivering up to R-6.5 per inch.
- Fill Framing Cavities: Add dense-pack mineral wool or fiberglass batt insulation between the 2×6 floor joists.
- Under-Soffit Sheathing: Seal the underside exterior with 1/2-inch exterior-grade plywood or fiber-cement soffit boards, caulking every seam to prevent wind wash from stripping away heat.
- Decorative Brackets: For long projections, install exterior load-bearing structural brackets or decorative corbels to support the platform and complement the home’s architecture.
Comparing Modern Nailing Fin and Traditional Masonry Bay Styles
Installation methods differ significantly between modern residential framing and traditional masonry structures:
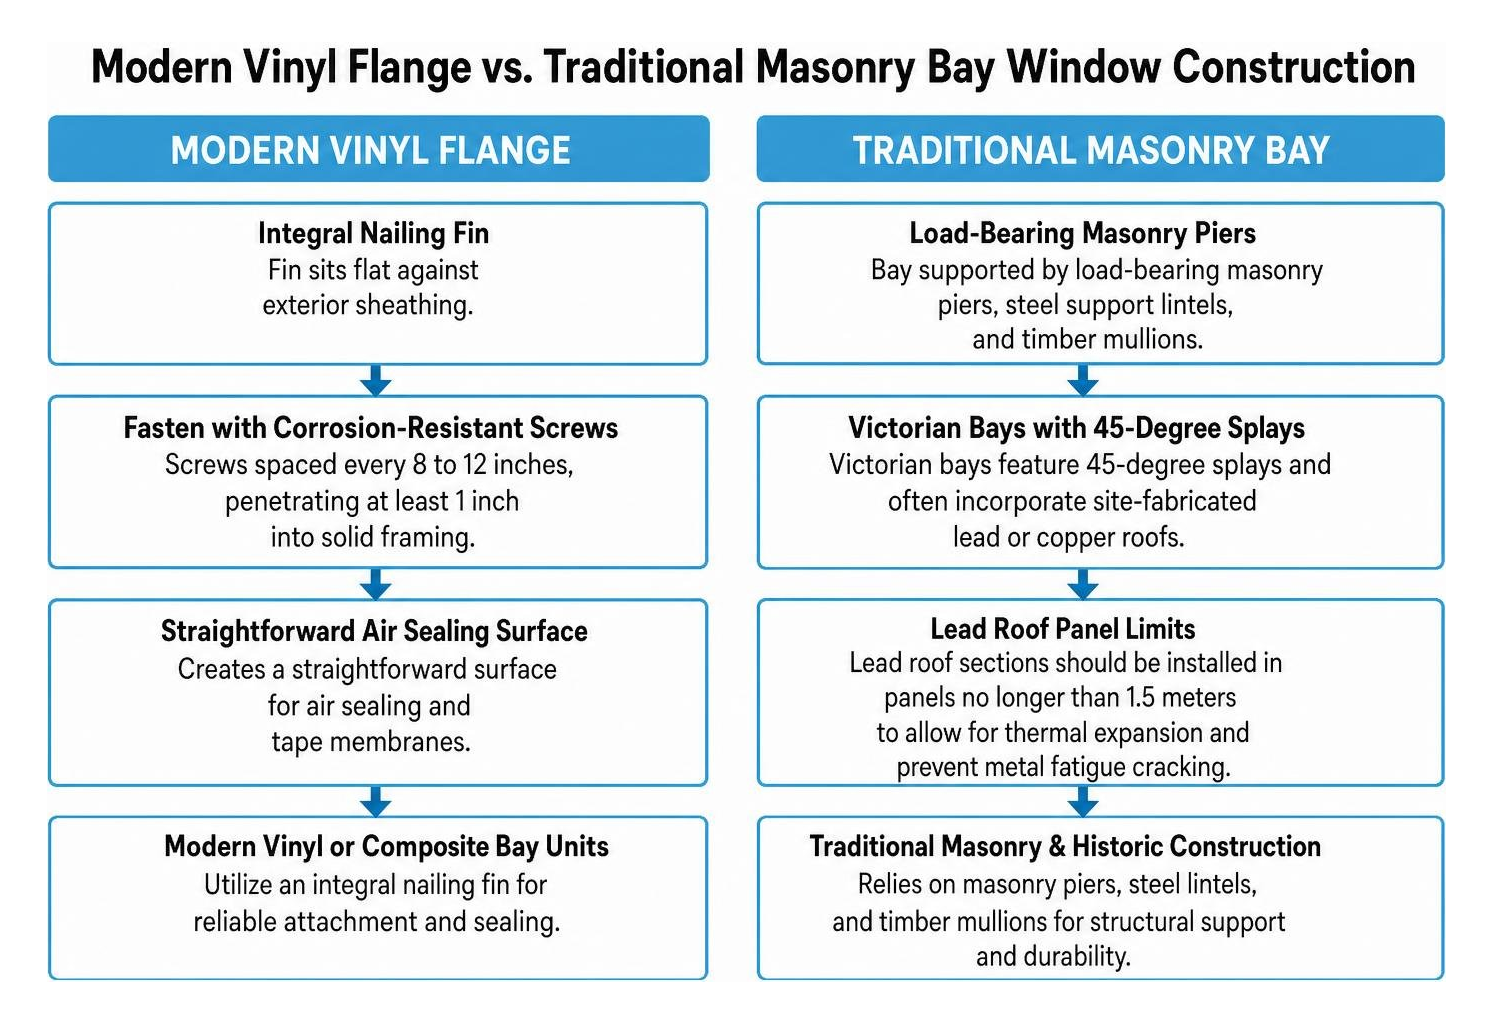
Modern vinyl and composite bay units utilize an integral nailing fin. The fin sits flat against the exterior sheathing and is fastened with corrosion-resistant screws spaced every 8 to 12 inches, with fasteners penetrating at least 1 inch into solid framing. This creates a straightforward surface for air sealing and tape membranes.
In contrast, traditional masonry and historic Victorian-style bays rely on load-bearing masonry piers, steel support lintels, and timber mullions. Victorian bays feature 45-degree splays and often incorporate site-fabricated lead or copper roofs. Lead roof sections should be installed in panels no longer than 1.5 meters to accommodate thermal expansion and prevent metal fatigue cracking over time. Homeowners interested in heritage architecture can review traditional techniques through authentic Victorian bay window construction methods or explore our guide on designing stone or concrete bays.
Frequently Asked Questions About Bay Window Construction
How much larger should the rough opening be for a bay window?
A rough opening should be framed exactly 1/2 inch larger than the total exterior window unit dimension in both width and height. This provides a 1/4-inch clearance around all sides for square shimming, structural adjustment, and expansion. The maximum allowable plumb and level deviation across the entire rough opening is 1/8 inch.
How do you prevent cold air and drafts under a cantilevered bay window?
Prevent cold drafts by sealing all joint penetrations with expanding polyurethane foam, installing high-R-value rigid foam board tight against the underside subfloor, and packing the joist cavities with dense mineral wool insulation before capping the exterior underside with sealed soffit sheathing.
What fasteners and spacing are required for structural bay window anchoring?
Install #10 corrosion-resistant pan-head screws or heavy-duty structural screws that penetrate at least 1 inch into solid wall studs. Fasteners around the perimeter nailing flange or interior mounting brackets should be spaced no more than 12 inches apart, with dedicated fasteners positioned 3 to 7 inches from each corner in compliance with local structural codes, such as local Glenview building engineering guidelines.
Conclusion
Getting bay window construction details right requires precision at every stage: calculating structural loads, framing rigid cantilevers, building watertight roofs, and creating complete thermal seals beneath the floor. When properly constructed, a bay window adds lasting curb appeal, abundant daylight, and comfortable space to your home.
At Perfect Windows & Siding, we have spent over 20 years delivering custom window, siding, and door solutions throughout Des Plaines, Park Ridge, Morton Grove, and the greater Chicago area. Our licensed and insured installation specialists back every project with craftsmanship and a comprehensive lifetime warranty. When you are ready to upgrade your home, schedule your consultation with our expert team or contact us to get a free estimate.