

Rebuilding a Bay Window Starts With Support and Water Damage
If your bay window is sagging, pulling away from the wall, or rotting, don’t start by replacing the glass. Have the framing, support system, and roof flashing checked first. A lasting rebuild means removing damaged parts, repairing the opening, setting and supporting the new window, then insulating and weatherproofing every exposed joint.
A fogged pane alone may only need glass replacement. But rot or movement can point to damage that a simple repair won’t fix. In Chicago-area homes, the bay’s exposed roof and underside also need careful sealing to keep out rain and cold air.
I’m Voytek Glab, owner of Perfect Windows & Siding. For over 20 years, my work in window installation and carpentry across Chicagoland has shaped how I approach rebuilding bay window assemblies: start with sound structure, then make sure the finished window stays dry and comfortable.
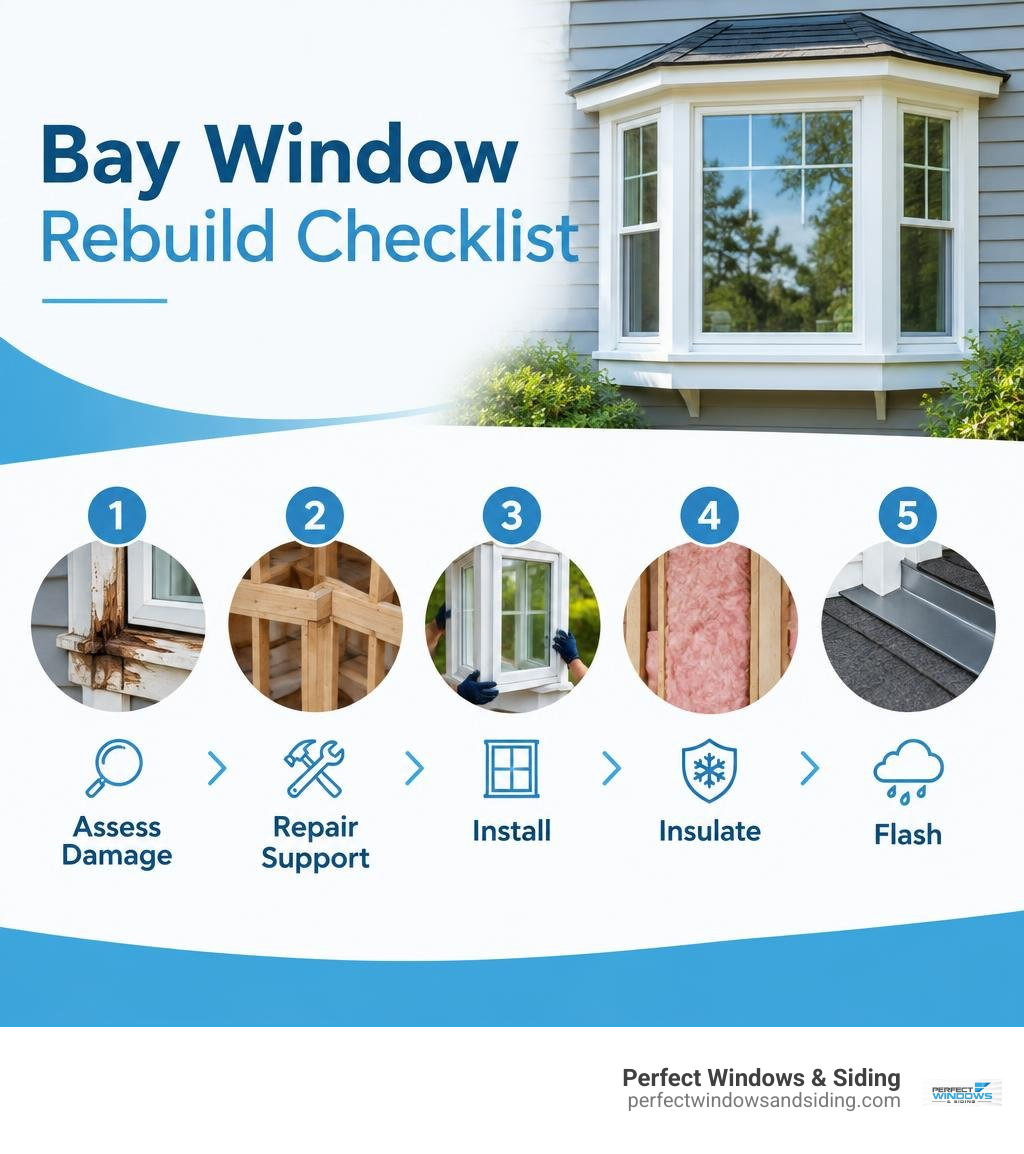
Must-know rebuilding bay window terms:
Signs Your Bay Window Requires a Full Rebuild vs. Minor Repair
Recognizing early warning signs makes the difference between an isolated repair and a necessary total reconstruction. Bay windows function as cantilevered micro-structures. Unlike flat, standard windows embedded entirely within the wall cavity, bay units project outward and remain vulnerable on five distinct surfaces: top, bottom, front, and both sides.
Visible symptoms indicating progressive structural degradation include:
- Visible Sagging or Drooping: The outer corners tilt downward, pulling away from the exterior siding or interior drywall.
- Rotted Wood Components: Soft, crumbling wood found in the seat board, mullions, head board, or exterior sill.
- Persistent Water Stains and Mold: Staining on interior drywall adjacent to the upper corners or along the bottom seat.
- Operational Sticking: Sashes on the flanking operational units bind, stick, or refuse to lock because the frame has racked out of square.
- Severe Drafts and Cold Pooling: Frigid drafts around the seat board during winter months, suggesting insulation failure or separation from the wall studs.
- Insulated Glass Seal Failure: Persistent interior condensation or fogging trapped between the glass panes.
If the structural framing, seat board, and exterior supports remain dry, plumb, and intact, you may only need targeted bay window glass replacement. However, if the framework reveals structural movement, timber decay, or water intrusion, a complete rebuild is necessary.
Bay Windows vs. Bow Windows: Structural and Design Differences
Understanding the architectural distinction between bay and bow windows is essential when planning a renovation.
Bay windows feature a classic angular profile consisting of three panels: a large, fixed center picture window flanked by two operable side units (typically double-hung or casement styles) set at 30-degree or 45-degree angles. This deep projection creates a comfortable interior nook or bench.
Bow windows use four to six panels of equal size joined together at subtle 10-to-15-degree angles, forming a smooth, curved aesthetic. Because bow windows project less dramatically from the exterior wall, their weight spreads evenly across a broader curved perimeter. Homeowners exploring vintage architecture can consult our guide on a Vintage Home Renovation Architect in Chicago, IL to preserve original architectural character during window upgrades.
Repair vs. Full Replacement Decision Matrix
Determining the right scope of work requires evaluating several structural indicators:
| Inspection Criterion | Minor Repair Candidate | Full Rebuild Required |
|---|---|---|
| Wood Framing Condition | 100% solid framing; only minor surface paint peeling | Soft, spongy, or rotted seat board, head board, or studs |
| Level and Plumb | Unit is square; sashes open and close smoothly | Unit leans outward or sags; sashes jam in the frames |
| Glass Condition | Single failed seal; isolated broken pane | Multiple blown seals combined with sagging frames |
| Flashing & Roof Condition | Flashing intact; no interior or exterior moisture leaks | Failed roof cap; water intrusion behind the wall sheathing |
| Support System | Cables or braces are tight, secure, and rust-free | Loose anchors, corroded brackets, or missing support |
Essential Structural Engineering: Cantilevers, Cables, and Knee Braces
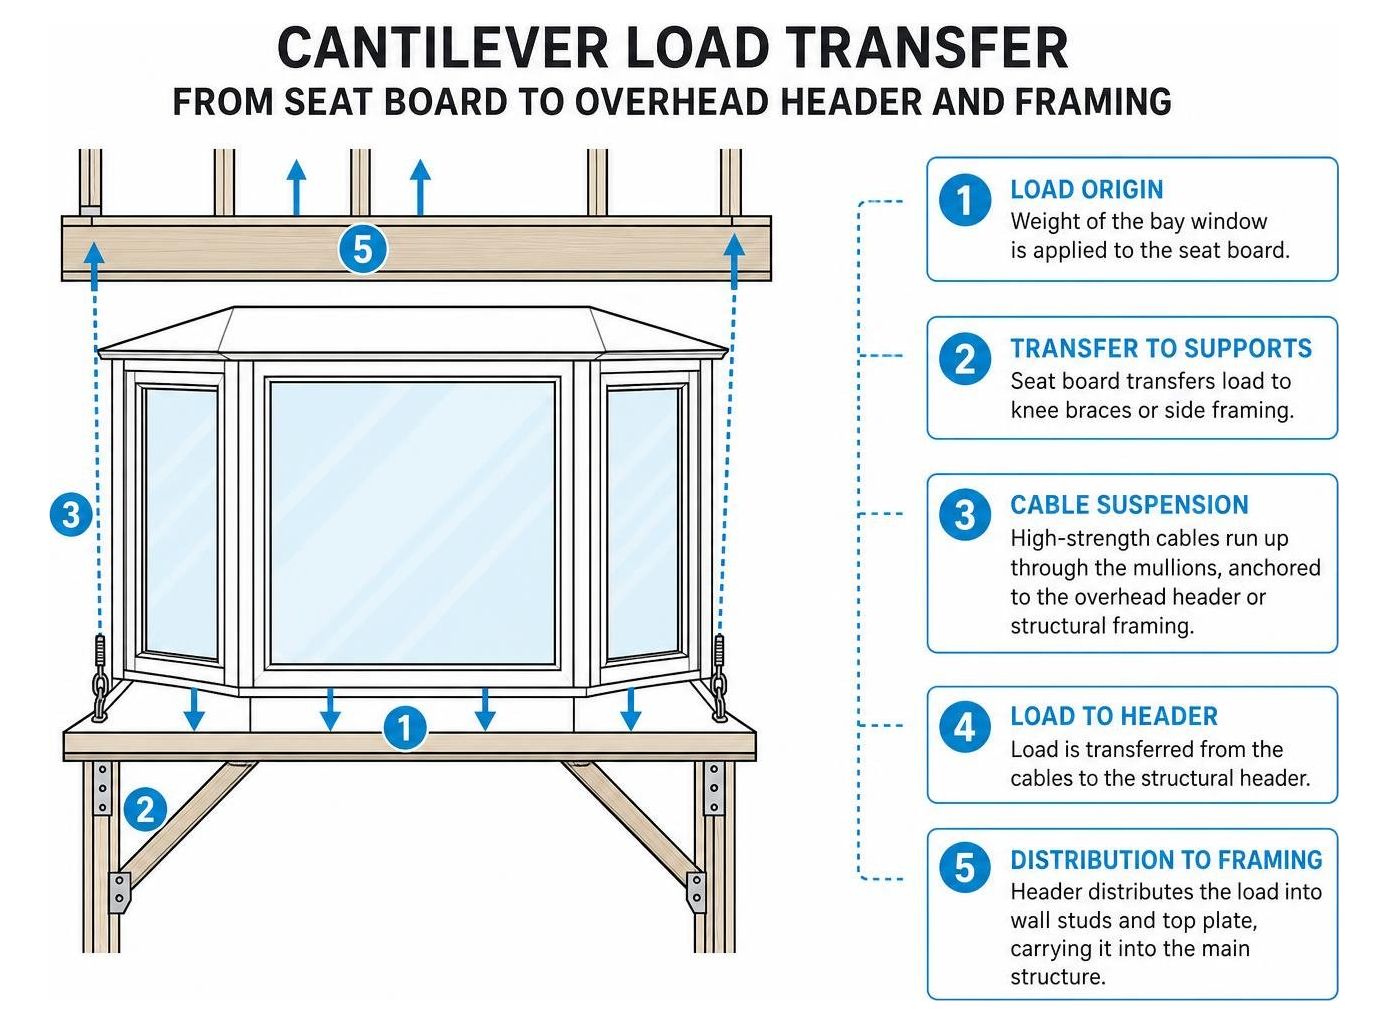
A fully assembled bay window—complete with triple-pane insulated glass, heavy hardwood framing, structural headers, insulated seat boards, and an exterior roof cap—can easily exceed 500 pounds. Because this weight hangs past the exterior wall without ground foundation support, proper cantilever engineering is essential.
Understanding load paths is critical. The wall studs, side jacks, and overhead structural header carry the entire gravitational load. The weight cannot rest on decorative mullions or simple window frame nailing fins. Detailed structural tie-ins require understanding every component within the bay window section detail.
Cable Suspension Systems vs. Exterior Knee Braces
Two proven methods support cantilevered bay windows:
- Overhead Cable Suspension Systems: High-strength, threaded steel cables run from the exterior bottom corners of the seat board up through the window frame mullions, anchoring directly into the house’s solid structural framing or top wall plate. Heavy-duty turnbuckles allow installers to tension the assembly, lifting the outer edge slightly above level to ensure long-term stability against gravity. This provides a clean aesthetic beneath the window, making it ideal over patios or garden walkways.
- Exterior Knee Braces (Corbels): Heavy-duty triangular brackets mounted directly to the exterior wall framing or masonry beneath the window seat. These diagonal struts transfer gravitational loads back into the structural foundation. While visible from the ground, they add classic architectural character and provide support for deep, heavy projections.
Structural Assessment Before Rebuilding Bay Window Frames
Before installing a replacement unit, we inspect the rough opening to ensure structural readiness:
- Header Integrity: Verify that the primary overhead header has not sagged or suffered dry rot from previous roof leaks.
- Stud Plumb and Square: Ensure side king and jack studs are plumb, true, and securely nailed to the surrounding wall framing.
- Moisture Intrusion Checks: Inspect the surrounding wall sheathing and house wrap for concealed water tracking, wood decay, or insect damage.
Complete Guide to Rebuilding Bay Window Structures Step-by-Step
A bay window rebuild requires precision framing, rigging, weatherproofing, and carpentry. Here is the process our teams follow across Chicago, Des Plaines, Park Ridge, and Morton Grove.

Removing the Compromised Unit and Repairing Framing
- Interior Protection and Trim Removal: Protect the room interior with plastic sheeting and drop cloths. Carefully remove interior casing, stool, and apron trim using pry bars.
- Temporary Shoring: Construct temporary exterior 2×4 shoring beneath the window unit to take the load before releasing the old structural supports.
- Flashing and Roof Disassembly: Remove the exterior roof cap, shingles, and metal counter flashing to access the top attachment points.
- Unit Extraction: Back out all frame fasteners, release suspension cables or brackets, and remove the old window assembly.
- Framing Remediation: Cut away rotted sill framing, sister deteriorated studs with new structural lumber, treat the opening with antimicrobial spray, and ensure the rough opening is square and level.
Setting, Anchoring, and Tensioning the New Assembly
- Sub-Sill Flashing: Apply a heavy-duty, self-adhering flashing membrane over the rough sill, creating a waterproof barrier turned up at the sides and back.
- Positioning the Assembly: Using mechanical lifting equipment or a four-person crew, lift the bay assembly into the prepared opening.
- Shimming and Leveling: Place structural composite shims beneath the unit, leveling it along the front face and from back to front.
- Primary Securing: Drive structural screws through the side jambs and head board into the framing studs.
- Engaging the Support System: Install overhead suspension cables or secure heavy-duty knee braces below. Adjust turnbuckles until the front edge sits 1/8-inch proud of level to accommodate future settling under load.
For more technical installation procedures, see our bay window installation complete guide.
Rebuilding Bay Window Roof Caps and Flashing Systems
The roof cap represents the primary point of failure for bay windows. If water bypasses the flashing, moisture travels into the wall structure.
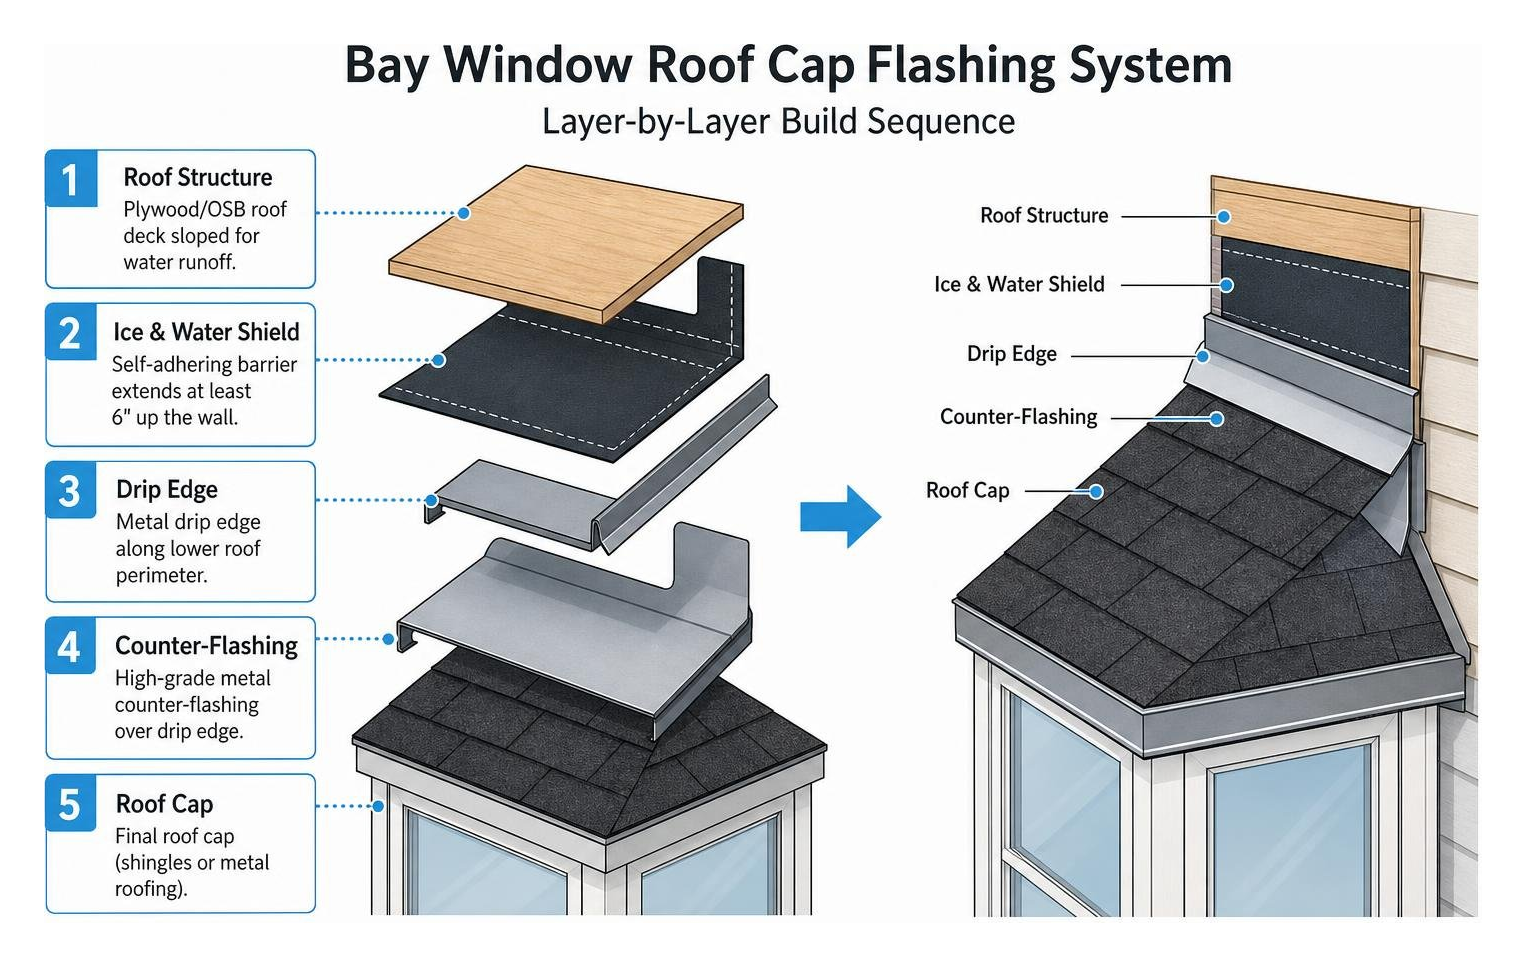
To build a durable, leak-proof roof:
- Frame the roof structure using exterior-grade plywood or OSB sloped at a minimum pitch to promote water runoff.
- Cover the roof deck with self-adhering ice-and-water barrier, extending it at least 6 inches up the vertical wall sheathing.
- Install a metal drip edge along the lower roof perimeter.
- Apply high-grade metal counter-flashing tucked beneath the house wrap and exterior siding.
- Finish with standing-seam copper, pre-formed aluminum, or matching architectural asphalt shingles.
Weatherproofing, Seat Cavity Insulation, and Air Sealing
A bay window acts as an exterior extension of your home. Without proper insulation, the seat area will feel cold and drafty during Midwest winters.
- Low-Expansion Polyurethane Foam: Fill the gap between the window jambs and wall framing with low-expansion foam to block air leaks without bowing the window frames.
- Insulating the Underside Seat Cavity: Pack the cavity beneath the seat board with high-R-value rigid foam board or closed-cell spray foam to eliminate thermal bridging.
- Exterior Soffit Finishing: Seal the underside with maintenance-free aluminum or cellular PVC soffits, caulking every joint with exterior polyurethane sealant to keep out wind and pests.
- High-Performance Glazing: Pair the insulated framing with modern energy efficient windows to keep your living room comfortable year-round.
Material Selection and Energy Performance
Selecting appropriate materials ensures structural durability and high thermal performance across varying seasons.
Comparing Frame Materials: Vinyl, Wood, Fiberglass, and Clad Wood
| Frame Material | Structural Rigidity | Thermal Insulation | Maintenance Needs | Resistance to Moisture & Rot |
|---|---|---|---|---|
| Fiberglass | Exceptional (minimal thermal expansion) | Outstanding (foam-filled cores) | Very Low (factory powder-coat) | Total immunity to rot and insect damage |
| Clad Wood | High (solid structural timber core) | Excellent (natural wood insulation) | Low exterior / Moderate interior | High exterior protection; interior requires finishing |
| Premium Vinyl | Moderate to High (requires metal reinforcement) | Very Good (multi-chambered extrusions) | Zero (wipes clean) | Total immunity to moisture decay |
| Traditional Wood | High (solid construction) | Excellent (low conductivity) | High (requires regular painting/staining) | Vulnerable to rot if paint or flashing fails |
Fiberglass and aluminum-clad wood provide superior structural stability for wide bay spans, preventing frame deflection caused by temperature swings.
Glass Packages and Thermal Efficiency
Because bay windows feature expansive surface areas, high-performance glass packages are critical:
- Double-Pane vs. Triple-Pane: Triple-pane glass incorporates three sheets of glass separated by two insulated cavities, reducing exterior noise and cutting heat transfer.
- Low-E Coatings: Microscopically thin metallic coatings reflect infrared heat back into your home during winter while reflecting solar heat away during summer.
- Argon Gas Fills: Dense, non-toxic argon gas injected between panes provides better insulation than standard air.
- U-Factor Ratings: Aim for a U-factor of 0.28 or lower to ensure optimal thermal performance during harsh winter weather.
Hiring a Contractor vs. DIY Considerations
A bay window rebuild is rarely a suitable DIY project. The sheer weight of the assembly—often exceeding 500 pounds—combined with complex structural shoring, cantilever mechanics, and critical roof tie-ins demands specialized carpentry tools and experienced crews. A small mistake in cable tensioning or flashing can result in sagging frames, dry rot, and wall damage within just a few seasons.
When vetting an exterior remodeling contractor, make sure to ask:
- How many years of dedicated experience do you have with cantilevered window structures?
- Will you assess, repair, and reinforce the underlying rough opening and structural header?
- Do you use overhead cable suspension systems, exterior knee braces, or both?
- What specific steps do you take to insulate and air-seal the underside seat cavity?
- Are your installation crews fully licensed, insured, and backed by a comprehensive lifetime workmanship warranty?
Frequently Asked Questions About Bay Window Rebuilds
Can you rebuild a bay window without replacing the roof structure?
Yes, if the existing roof structure, framing lumber, and metal flashing remain solid, dry, and square. However, if our technicians discover moisture rot, damaged sheathing, or outdated flashing details during demolition, we recommend rebuilding the roof cap to protect the new window assembly.
Why is the area under a bay window seat always cold?
The seat board extends past the home’s exterior foundation, exposing its underside to sub-freezing air. If the builder failed to insulate and air-seal this void, cold air chills the seat board through thermal bridging. We resolve this by packing the seat cavity with high-density rigid insulation and applying low-expansion spray foam along all seams.
How long does a bay window replacement project typically take?
A professional bay window rebuild usually takes one to two full days of on-site labor. Day one focuses on safe removal, structural framing remediation, setting the new unit, and securing the suspension support. Day two covers roof rebuilding, exterior flashing integration, insulation, air sealing, and interior trim finishing.
Conclusion
Rebuilding your bay window is one of the most rewarding home improvements you can make. When engineered with structural support, insulated against the elements, and sealed with professional-grade flashing, a new bay window will deliver decades of beauty, comfort, and enhanced curb appeal.
At Perfect Windows & Siding, our family-owned business brings more than 20 years of window installation and carpentry experience to homeowners throughout Des Plaines, Park Ridge, Morton Grove, and the greater Chicago area. We provide custom solutions backed by our dedicated lifetime warranty.
Ready to restore your home’s signature architectural feature? Explore our specialized bay window Park Ridge installation solutions, and schedule your consultation today. You can also get a free estimate from our experienced team to get your project started right.