
Why Proper Door & Window Installation Makes or Breaks Your Home
Door & window installation is one of the highest-impact upgrades you can make to your home — affecting your energy bills, security, curb appeal, and long-term comfort all at once.
Here’s a quick overview of what the process involves:
- Measure your existing opening accurately
- Choose the right material and style for your climate and home
- Remove the old unit carefully without damaging the surrounding frame
- Prepare the rough opening with flashing and a sill pan
- Set, shim, and level the new unit precisely
- Fasten and seal with low-expansion foam, caulk, and weatherstripping
- Inspect for drafts, alignment, and water management
Whether you’re replacing a single drafty window or upgrading every entry point in your home, the installation process matters as much as the product itself. A high-quality door or window installed incorrectly will still leak air, let in moisture, and underperform — sometimes for years before you notice the damage.
This guide walks you through every stage of the process, from taking your first measurement to applying the final bead of caulk.
I’m Voytek Glab, owner of Perfect Windows & Siding, and I’ve been specializing in door & window installation across the Chicagoland area — including Des Plaines, Park Ridge, and Morton Grove — for over 20 years. I’ll share the same techniques my team uses on every job, so you can approach your project with confidence.

Introduction to Modern Home Upgrades

When we talk about home improvement in April 2026, we aren’t just talking about aesthetics. While a fresh door & window installation certainly boosts your curb appeal—making your home the envy of the block in Arlington Heights or Palatine—it serves a much deeper purpose. Your windows and doors are the primary “envelope” of your home. They are the first line of defense against the biting Chicago winters and the humid Midwestern summers.
Modern upgrades focus on three pillars: security, energy efficiency, and property value. A new entry door isn’t just a piece of wood or fiberglass; it’s a reinforced barrier equipped with advanced locking mechanisms. Similarly, high-performance windows utilize multi-pane glass and inert gas fills to keep your furnace from working overtime.
From a financial perspective, high-quality installations are an investment in your home’s equity. Prospective buyers in markets like Wilmette or Hinsdale look specifically at the age and quality of the windows and doors. If they see Ultrex fiberglass or professionally installed steel doors, they know the home has been cared for.
Understanding the “anatomy” of your units is the first step. For windows, you’re dealing with the sash, the frame, the casing, and the glazing. For doors, you have the slab (the door itself), the jamb (the frame), the sill (the bottom), and the weatherstripping. Mastering these terms helps you speak the language of a pro.
Essential Preparation for Door & Window Installation

If there is one mantra we live by at Perfect Windows & Siding, it’s “measure twice, cut once.” Actually, in our case, it’s “measure three times, order once.” Preparation is the difference between a smooth Saturday afternoon project and a week-long nightmare involving plywood-covered openings.
Precise Measurements
You must measure the rough opening, not just the old window or door. The rough opening is the structural space between the wall studs. For windows, measure the width at the top, middle, and bottom. Use the smallest of these three measurements. Do the same for the height (left, center, right). If you’re unsure, check out our guide on How to Measure a Window for Replacement.
The Chicago Climate Factor
In areas like Des Plaines, Park Ridge, and Morton Grove, we deal with extreme temperature swings. This means materials will expand and contract. Your rough opening should typically be 1/2″ to 3/4″ wider and 1/2″ taller than the new unit to allow for proper shimming and insulation.
Tool Checklist
Before you start, ensure you have the following:
- Tape measure and level (at least 4 feet long)
- Power drill and impact driver
- Hammer and pry bar
- Shims (cedar or composite)
- Low-expansion spray foam (designed specifically for windows/doors)
- High-quality silicone caulk
- Flashing tape and a sill pan
- Safety gear (gloves, eye protection)
Selecting High-Performance Materials and Styles
Choosing the right material is a long-term commitment. In the Chicagoland area, we recommend materials that can handle moisture and wind without warping.
- Fiberglass: This is the gold standard. Ultrex fiberglass, for instance, is eight times stronger than vinyl and expands at the same rate as glass, ensuring the seal remains airtight.
- Vinyl: A popular choice for its low maintenance and excellent insulation properties.
- Steel: Primarily used for entry doors, steel offers unmatched security and can last over 30 years when professionally installed.
- Wood: Offers a classic look but requires more maintenance to prevent rot in our wet climate. We often suggest wood interiors with fiberglass exteriors for the best of both worlds.
When it comes to style, your choice should match your home’s architecture. Casement windows are great for ventilation, while bay windows add space and light to a living room. For entrances, consider French door installation to create a grand transition to your patio.
If you’re planning a large-scale project, we offer various financing options to help you get the high-quality products your home deserves without delay. Investing in an energy efficient door installation now pays dividends in comfort for decades.
Step-by-Step Guide to Professional-Grade Installation
Ready to get your hands dirty? Follow this professional workflow to ensure your door & window installation stands the test of time.
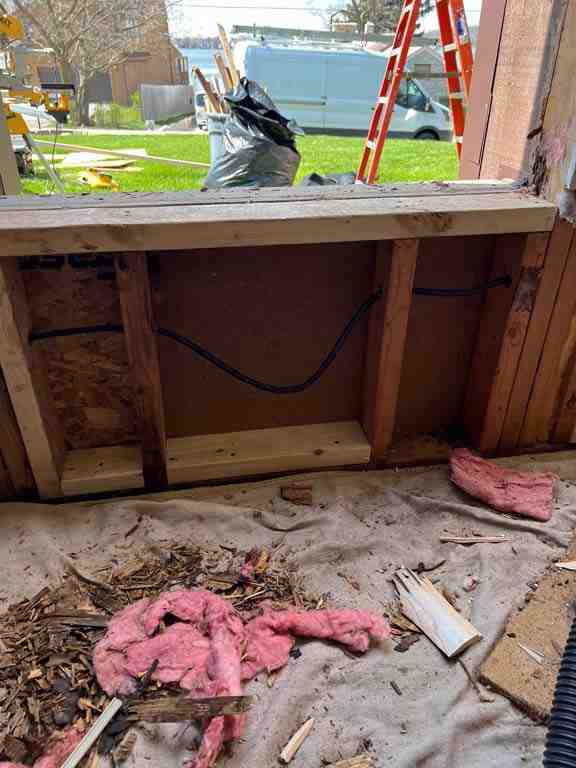
- Removal: Carefully remove the old unit. Use a pry bar to take off the interior trim first, then unscrew the unit from the frame. In older Chicago homes, be prepared for some “surprises” behind the walls, like rot or outdated insulation.
- Prepare the Rough Opening: Clean away any debris. Inspect the studs for water damage. If the wood is soft, it must be replaced before proceeding.
- Install the Sill Pan: This is a step many DIYers skip, but it’s vital. A sill pan catches any water that might sneak past the seals and directs it back outside.
- Apply Flashing Tape: Use high-quality flashing tape around the perimeter of the opening. This creates a secondary water barrier.
- Dry Fit: Lift the new unit into the opening (always have a helper for this!) to ensure it fits with enough room for shims.
- Shimming: This is where the magic happens. Place shims behind the hinge points of a door or at the corners of a window. Your goal is to make the unit perfectly level, plumb, and square.
- Fastening: Once level, drive screws through the shims into the studs. For doors, replace at least one screw in each hinge with a 3-inch screw that reaches the structural stud for extra security.
For a deeper dive into window-specific nuances, see our Window Installation Guide 2025.
Mastering the Door & Window Installation Process
Precision is everything. Even a 1/8-inch tilt can cause a door to swing open on its own or a window to stick.
- Alignment: Check that the gaps (reveals) between the door slab and the frame are even all the way around.
- Low-Expansion Foam: Only use foam labeled for “Window and Door.” Standard high-expansion foam can actually bow the frame, preventing the unit from operating.
- Caulking: Apply a continuous bead of silicone caulk around the exterior trim. Leave a small gap at the bottom of the window sill to allow moisture to escape (this is called a “weep hole” area).
- Weatherstripping: Ensure the weatherstripping compresses evenly when the door or window is closed. This is your primary defense against drafts. If you’re struggling with old units, check our Exterior Door Installation tips.
Pre-hung vs. Slab: Choosing the Right Door & Window Installation Method
One of the most common questions we get in our Chicago showrooms is whether to buy a pre-hung door or just the slab.
| Feature | Pre-hung Door | Slab Door |
|---|---|---|
| What is it? | Door already attached to a frame | Just the door “blank” |
| Skill Level | Intermediate | Advanced (requires routing hinges) |
| Frame Condition | Best if old frame is rotted/damaged | Only if old frame is perfect |
| Installation Speed | Fast (4-8 hours) | Slow (requires custom fitting) |
| Best For | Full replacements/Renovations | Historic preservation of original trim |
For most DIYers in areas like Schaumburg or Elk Grove Village, we strongly recommend pre-hung units. They eliminate the difficult task of mortising hinges and ensuring the door hangs straight within the jamb.
Maximizing Energy Efficiency and Home Security
In April 2026, a “good” window isn’t good enough. You want high-performance technology. Look for the U-factor (which measures how well the unit prevents heat from escaping) and the Solar Heat Gain Coefficient (SHGC) (which measures how much solar heat comes through the glass). As detailed by the U.S. Department of Energy, these ratings are critical for determining a window’s performance in specific climates. In Chicago, we want a low U-factor to keep the heat in during winter.
Security Upgrades
Your door & window installation is your home’s shield.
- 3-Inch Screws: As mentioned, anchoring your strike plate and hinges with 3-inch screws into the wall studs makes it nearly impossible to kick the door in.
- Deadbolt Alignment: Ensure the deadbolt throws fully into the hole. If it doesn’t click into place, the security is compromised.
- Laminated Glass: For ground-floor windows, consider laminated glass, which stays intact even if shattered, deterring intruders.
Proper insulation is the final piece of the puzzle. If you can feel a breeze, your money is literally flying out the window. Read our Drafty Window Replacement Complete Guide to identify and fix these weak points.
Avoiding Common Mistakes and Ensuring Longevity
Even with the best intentions, mistakes happen. Here are the “big ones” we see when we’re called in to fix a DIY project:
- Ignoring Water Management: If you don’t use flashing or a sill pan, water will eventually rot your subfloor. It’s not a matter of “if,” but “when.”
- Over-shimming: If you pack shims too tightly, you can bow the frame, causing the window to bind.
- Using the Wrong Sealant: Cheap caulk will crack within two seasons of Chicago weather. Always use 100% silicone or high-grade polymer sealants.
- Forgetting the Warranty: Many manufacturers require professional installation to keep the warranty valid. Always read the fine print. At Perfect Windows & Siding, we provide a lifetime warranty because we stand by our craftsmanship.
Professional vs. DIY
While DIY is possible for a single window, an entire house of window replacement is a massive undertaking. Professional installers bring specialized equipment and, more importantly, insurance. If a pro breaks a custom glass pane, they replace it. If you break it, you’re buying a second one.
For more expert advice, see our Window Replacement Complete Guide 2025.
Frequently Asked Questions about Installation

How long does a standard installation take?
For a single entry door installation, expect 4 to 8 hours. A full house of windows (around 10-15 units) typically takes our professional crew 1 to 2 days. For a DIYer, we recommend budgeting a full weekend for every 3 to 4 windows.
What are the signs that a unit was installed incorrectly?
- Drafts: If you feel air even when the unit is locked.
- Operation Issues: The door or window sticks, or won’t stay open/closed.
- Condensation: Moisture between the panes of glass (indicates a broken seal) or around the frame (indicates poor insulation).
- Water Stains: Any discoloration on the drywall around the unit.
Can I install windows and doors in the winter?
Yes! In Chicago, we install year-round. The trick is to work on one opening at a time to minimize heat loss. We also use specialized cold-weather sealants that cure properly even in freezing temperatures. Check out our Window Installation Chicago Guide for more local tips.
Conclusion: Ensuring Long-Term Performance
A successful door & window installation is a marriage of high-quality materials and meticulous technique. Whether you are tackling a DIY project in Northbrook or looking for expert help in Melrose Park, the goal remains the same: a home that is safe, quiet, and energy-efficient.
At Perfect Windows & Siding, we’ve spent over 20 years perfecting the art of the install. We treat every home in the Chicago suburbs as if it were our own, offering custom solutions and a lifetime warranty that provides ultimate peace of mind.
If you’ve realized your project might be bigger than a DIY weekend, or if you simply want the guarantee that comes with two decades of local expertise, we are here to help.
Ready to transform your home? Get a free estimate or Schedule your consultation today and let us help you find the perfect fit for your home.