

Get External Door Frame Fitting Right With 3 Key Changes
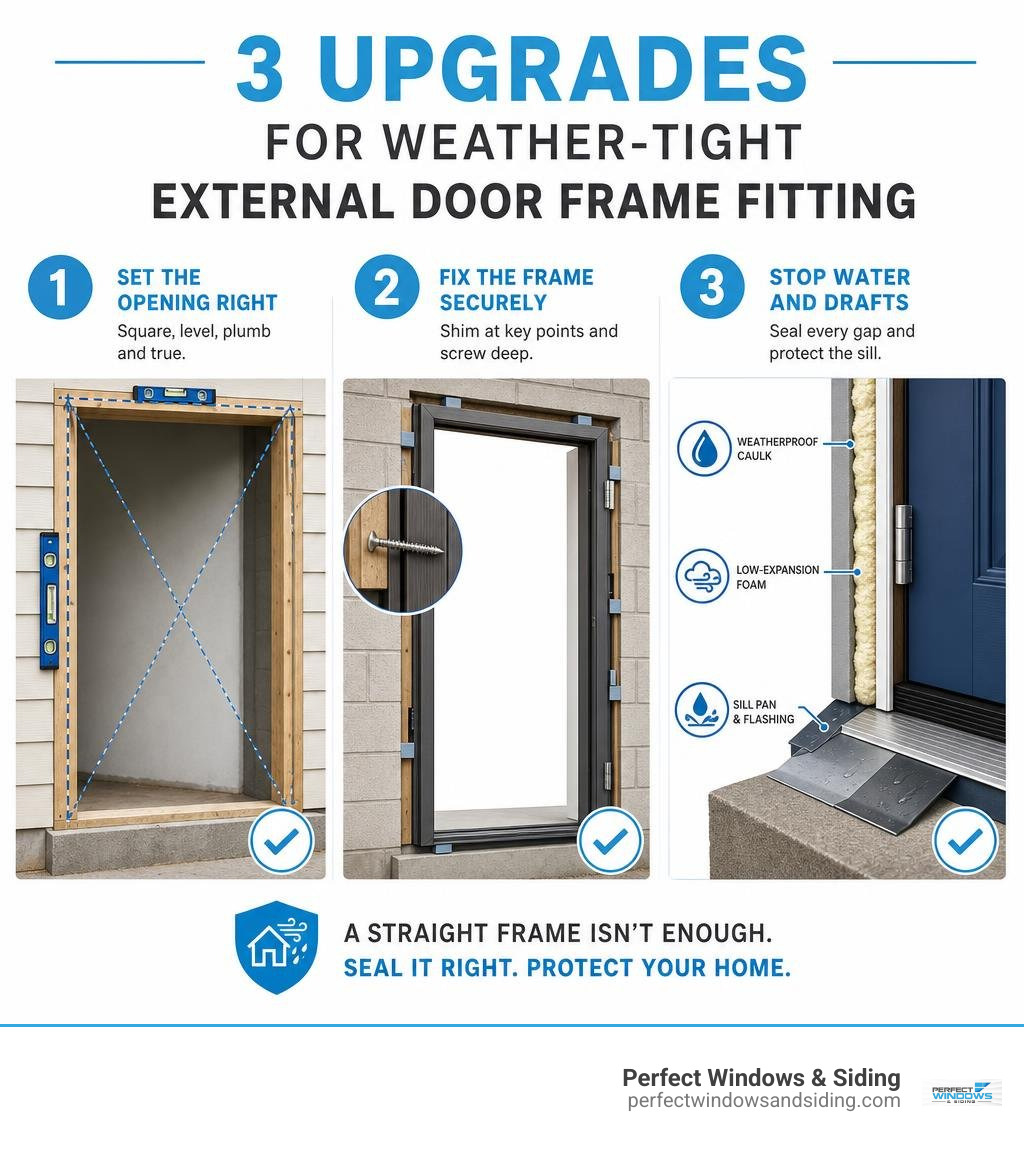
Successful external door frame fitting comes down to three things: prepare a square opening, anchor the frame without twisting it, and build a complete water and air seal around the sill and jambs.
- Set the opening right: Check level, plumb, and diagonal measurements before the frame goes in. The two diagonal measurements should be within 5 mm.
- Fix the frame securely: Shim at hinge and lock points, then use suitable frame screws that reach at least 50 mm into solid masonry or timber framing.
- Stop water and drafts: Install a sill pan and flashing, use low-expansion foam in the perimeter gap, and finish exterior joints with weatherproof caulk.
A door frame can look straight but still leak, bind, or sag if its sill is not level or its jambs are pulled out of plumb by overtightened fixings. The goal is a door that swings freely, locks easily, and seals evenly against wind-driven Chicago rain and winter air.
I’m Voytek Glab, owner of Perfect Windows & Siding, with more than 20 years of hands-on carpentry and exterior renovation experience in Chicagoland. I use proven external door frame fitting methods to help homeowners protect their entryways with durable, carefully aligned installations.
External door frame fitting terms simplified:
- exterior door weather stripping installation
- exterior threshold installation
- hang a prehung exterior door
Preparing the Aperture and Removing the Old Unit
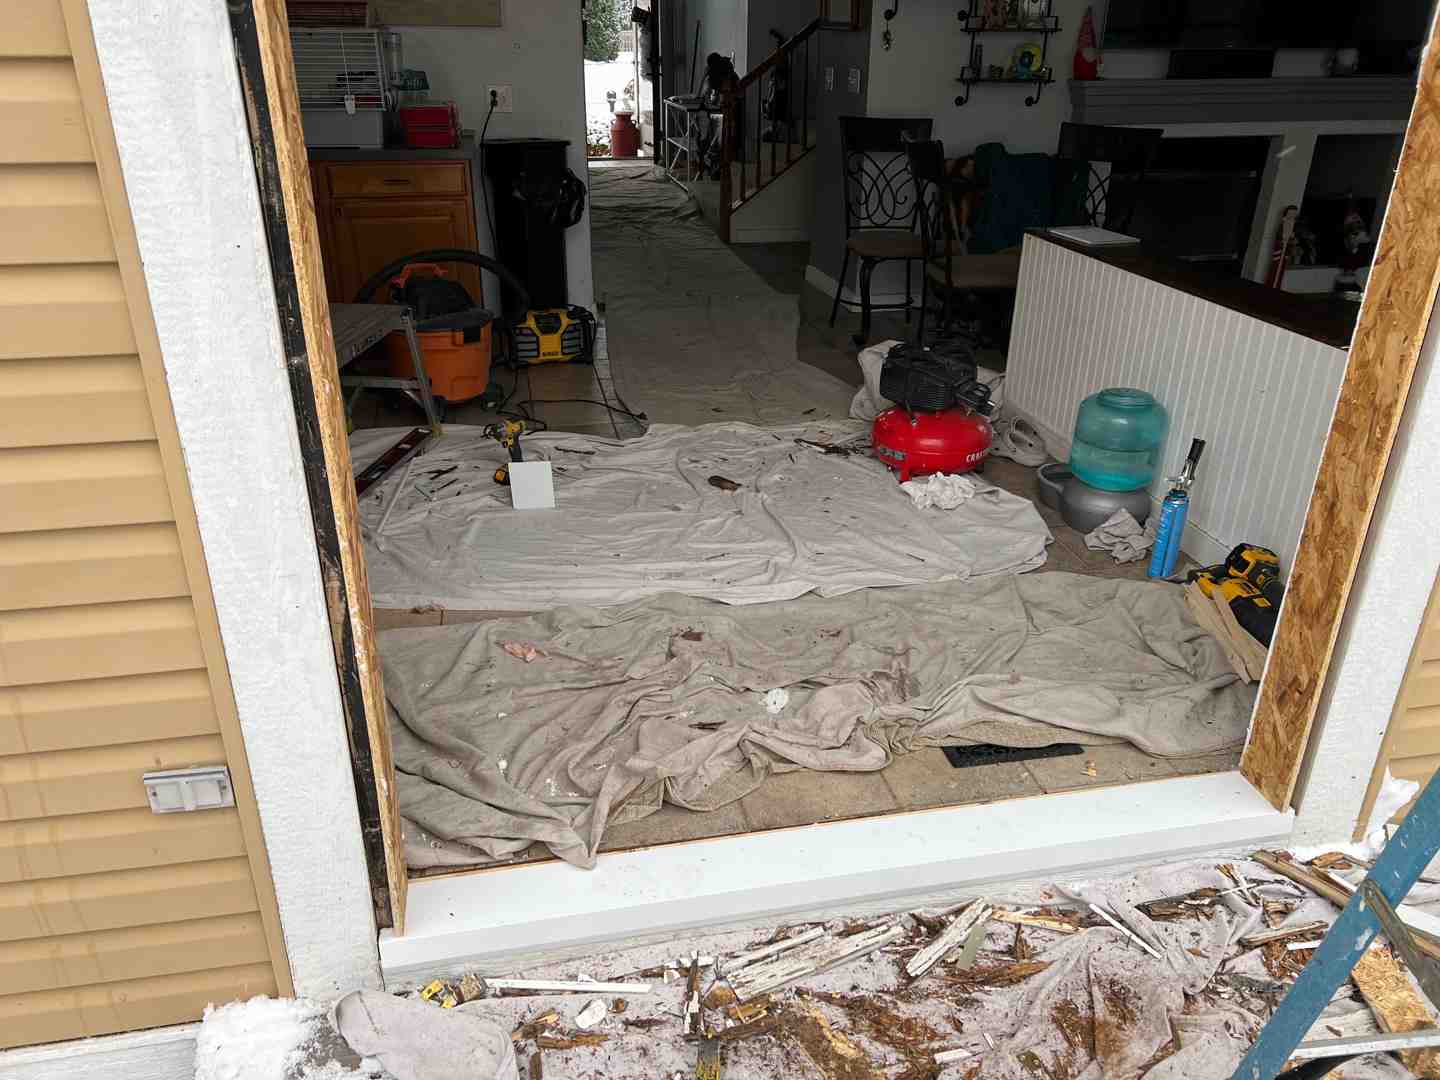
Before assembling or positioning your new components, you must prepare a clean, square, and structurally sound opening. Whether you are modifying a wall or following punching through your guide to creating a new exterior door opening, the rough aperture dictates the final performance of the door.
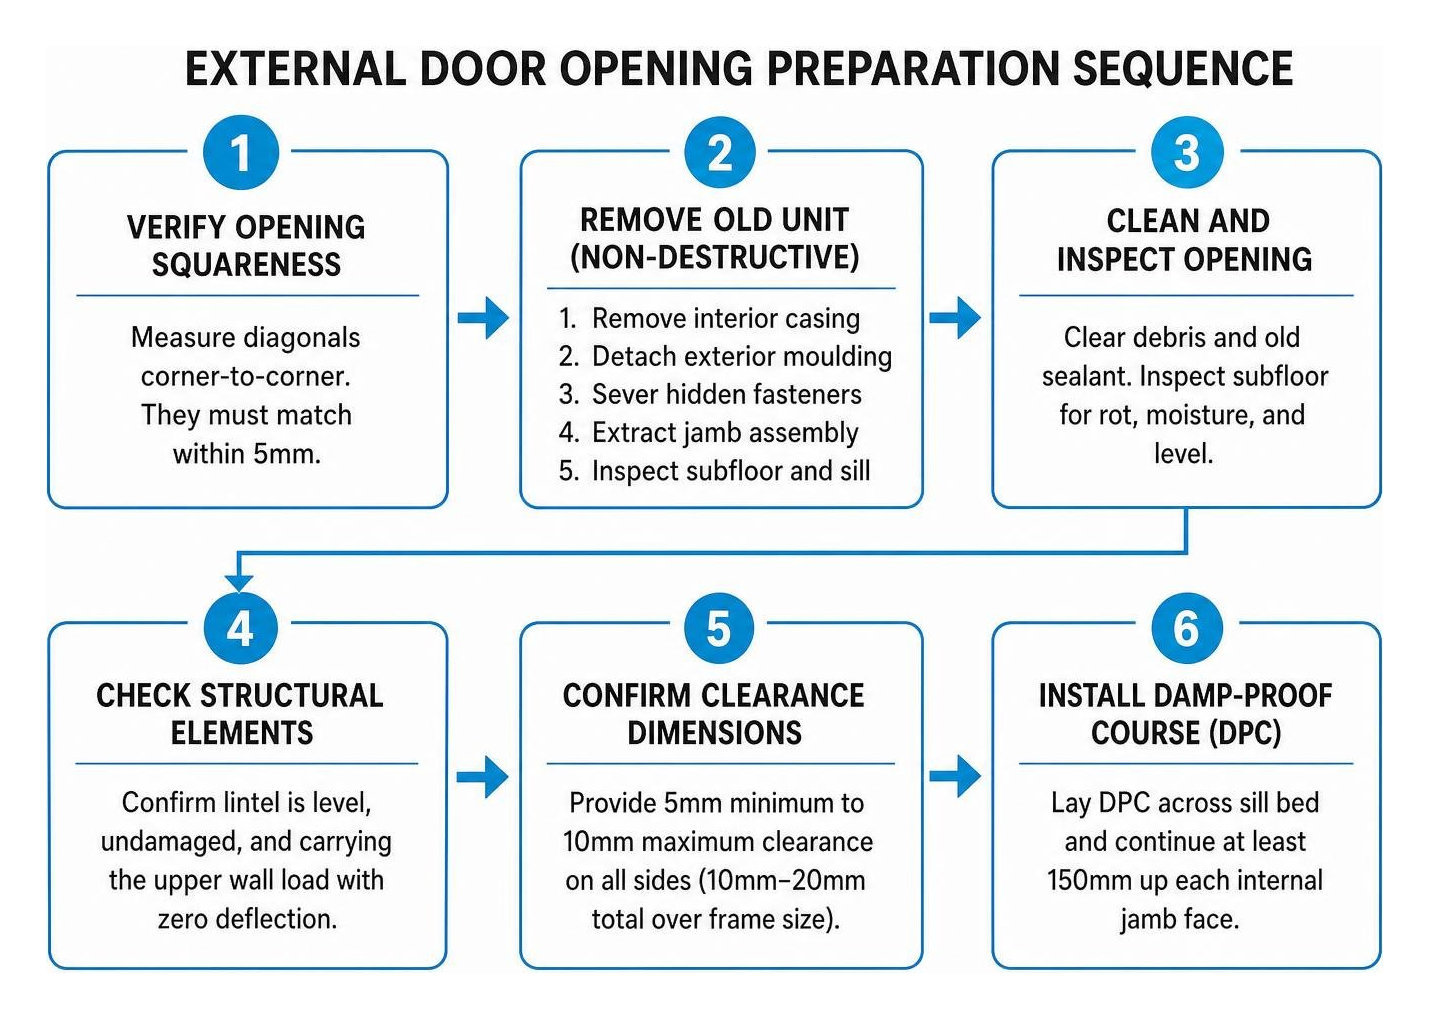
A functional entryway requires precise tolerances. Before attempting to fit the jambs, verify the squareness of the rough opening. Take corner-to-corner diagonal measurements across the aperture; the two diagonal dimensions must match within 5mm. If the opening is racked beyond 5mm, shim or re-frame the opening before proceeding.
Non-Destructive Frame Removal and Subfloor Preparation
Removing a damaged or rotted exterior frame does not mean destroying the surrounding interior plaster, drywall, or exterior brick moulding. Careful extraction preserves adjacent trim and finishes:
- Remove the interior casing: Score the painted edge between casing and wall with a sharp utility knife to prevent drywall tearing. Use a thin pry bar paired with a wide putty knife behind it to gently ease the interior trim away from the jambs.
- Detach exterior brick moulding: Carefully prize off the exterior moulding or decorative trim to expose the frame perimeter.
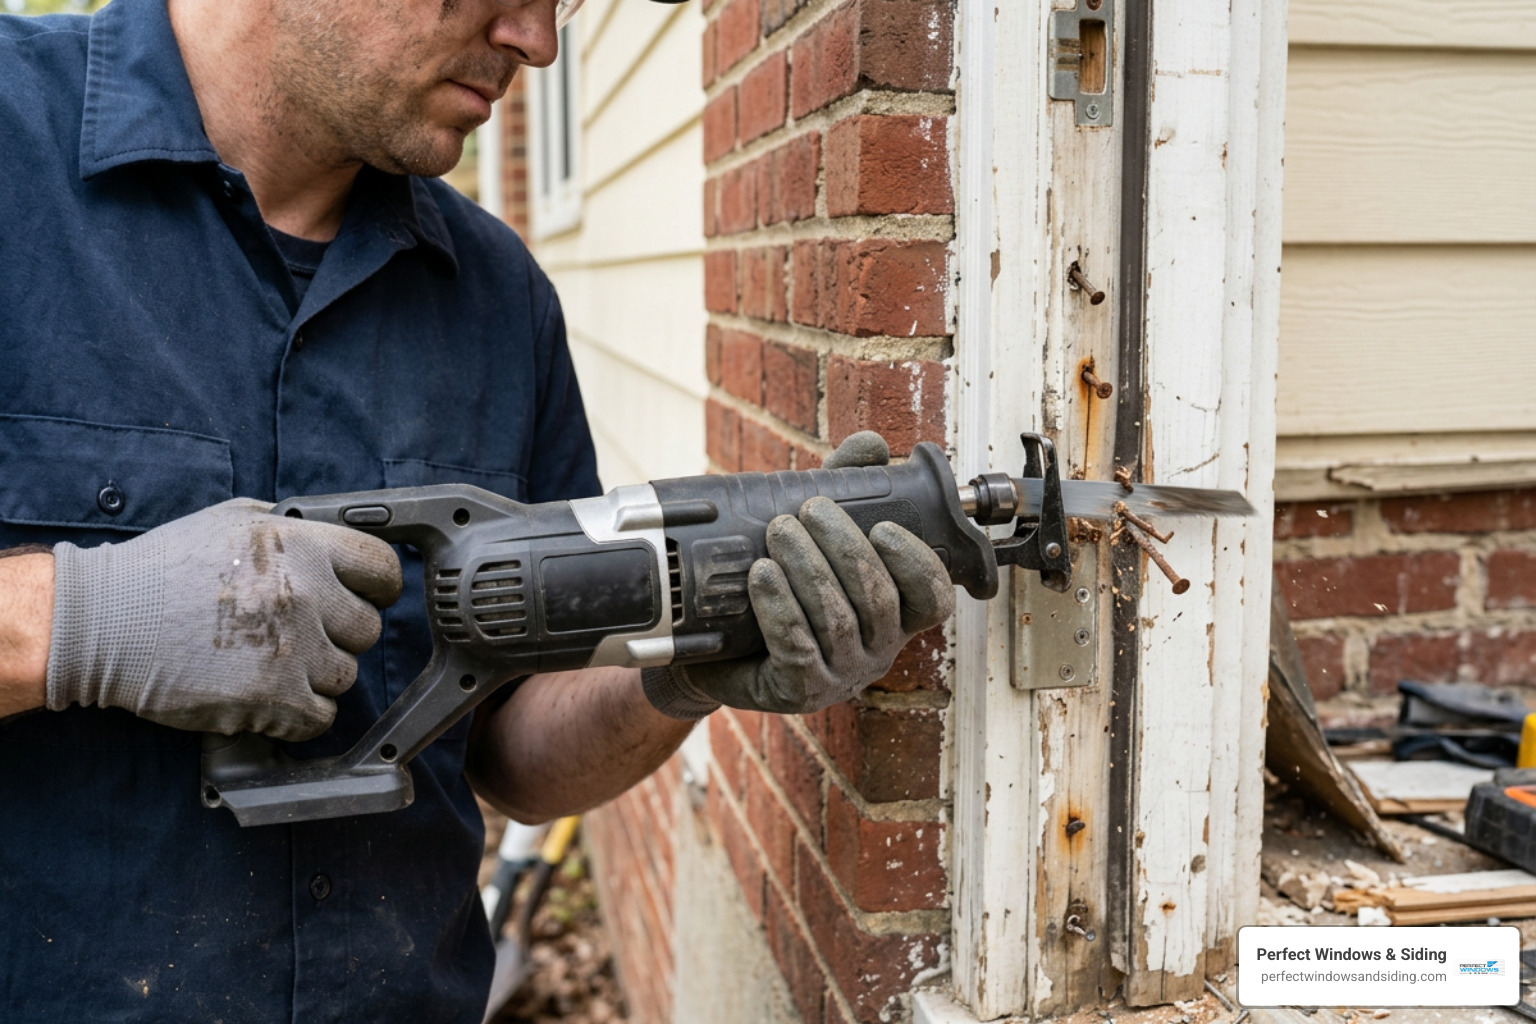
- Sever hidden fasteners: Insert a long bi-metal reciprocating saw or oscillating multi-tool blade into the gap between the jamb and the rough framing. Slice cleanly through all hidden framing nails, shims, and anchoring screws down both sides and across the head.
- Extract the old jamb assembly: With fasteners cut, tip the jamb forward from the top and lift it clear of the opening without disturbing surrounding wall claddings.
- Inspect the subfloor and sill: Check the exposed subfloor for structural rot, moisture damage, or unlevel framing. If soft wood is detected, cut back to solid framing and replace the deteriorated wood prior to undertaking an exterior door replacement.
Job-Site Tip: If you cannot finish the installation in a single day, always have a sheet of exterior-grade plywood cut to size and ready to screw over the exterior opening to maintain overnight weatherproofing and security.
Preparing the Opening for External Door Frame Fitting
A successful installation depends on proper moisture management and structural load checks:
- Clear substrate debris: Scrape off all remnants of old sealant, mortar crumbs, and deteriorated insulation from the masonry or timber rough opening.
- Inspect the lintel: Confirm that the overhead structural lintel is level, undamaged, and carrying the upper wall load with zero deflection pressing down on the frame aperture.
- Calculate clearance dimensions: Your rough aperture should provide a uniform clearance margin of 5mm minimum to 10mm maximum on all sides (totaling 10mm to 20mm over the outer frame dimensions). This spacing accommodates level packers, insulation voids, and thermal expansion.
- Integrate a Damp-Proof Course (DPC): Lay a durable DPC membrane across the masonry sill bed, continuing at least 150mm up each internal jamb face to isolate the timber or composite frame from porous masonry moisture.
Step-by-Step External Door Frame Fitting and Assembly
A standard external frame kit arrives flat-packed as a “knockdown” set containing two jambs, a head, an integrated or separate sill, and weatherstripping components. Unlike interior linings that use applied stops, external jambs incorporate thick, factory-rebated door stops designed to house robust 44mm (1-3/4 inch) thick exterior door slabs, as outlined in the External Doorsets Installation Guide v8.
Essential Tools & Hardware Checklist
- 4-foot and 6-foot precision spirit levels
- Hammer drill and cordless impact driver
- Direct-fixing concrete/frame anchor screws (min. 100mm to 120mm length)
- High-performance waterproof timber adhesive (D4 polyurethane or structural hybrid)
- Polymer-based exterior structural sealant / bedding mastic
- Solid, non-compressible horseshoe plastic shims (packers)
- Low-expansion expanding polyurethane foam
- Utility knife and fine-tooth handsaw
Assembling Knockdown Frame Kits and Sills
- Pre-finish bare timber: If you are installing an unfinished hardwood or softwood frame, coat all six sides of each component with preservative primer and finish coats prior to assembly.
- Score and cut cleanly: If jambs require trimming for lower door heights, score the cut lines deeply with a sharp utility knife to prevent chipping veneers before cutting with a fine-tooth saw. Immediately seal newly cut end grain with two coats of protective wood sealer.
- Bed the joinery in waterproof adhesive: Lay the head, jambs, and sill flat on clean, padded sawhorses or a level floor. Apply generous beads of waterproof D4 adhesive sealant into the mortise-and-tenon or halving joints.
- Fasten frame corners: Clamp the corners square, pre-drill pilot holes to prevent splitting, and drive heavy-gauge countersunk wood screws (typically 70mm to 80mm long) through the head and sill into the jamb ends. Check that diagonal corner-to-corner measurements of the assembled frame are within ±2mm.
- Install threshold components: Slot the sill weather bar into its dedicated groove or bed the aluminum threshold into a continuous bead of hybrid polymer sealant along the sill base before mechanically fastening it down.
Structural Anchoring and Fastener Layout for External Door Frame Fitting
To prevent wind load deflection, frame twist, and sagging from heavy door leaves, follow a strict fastener distribution pattern on every installation.
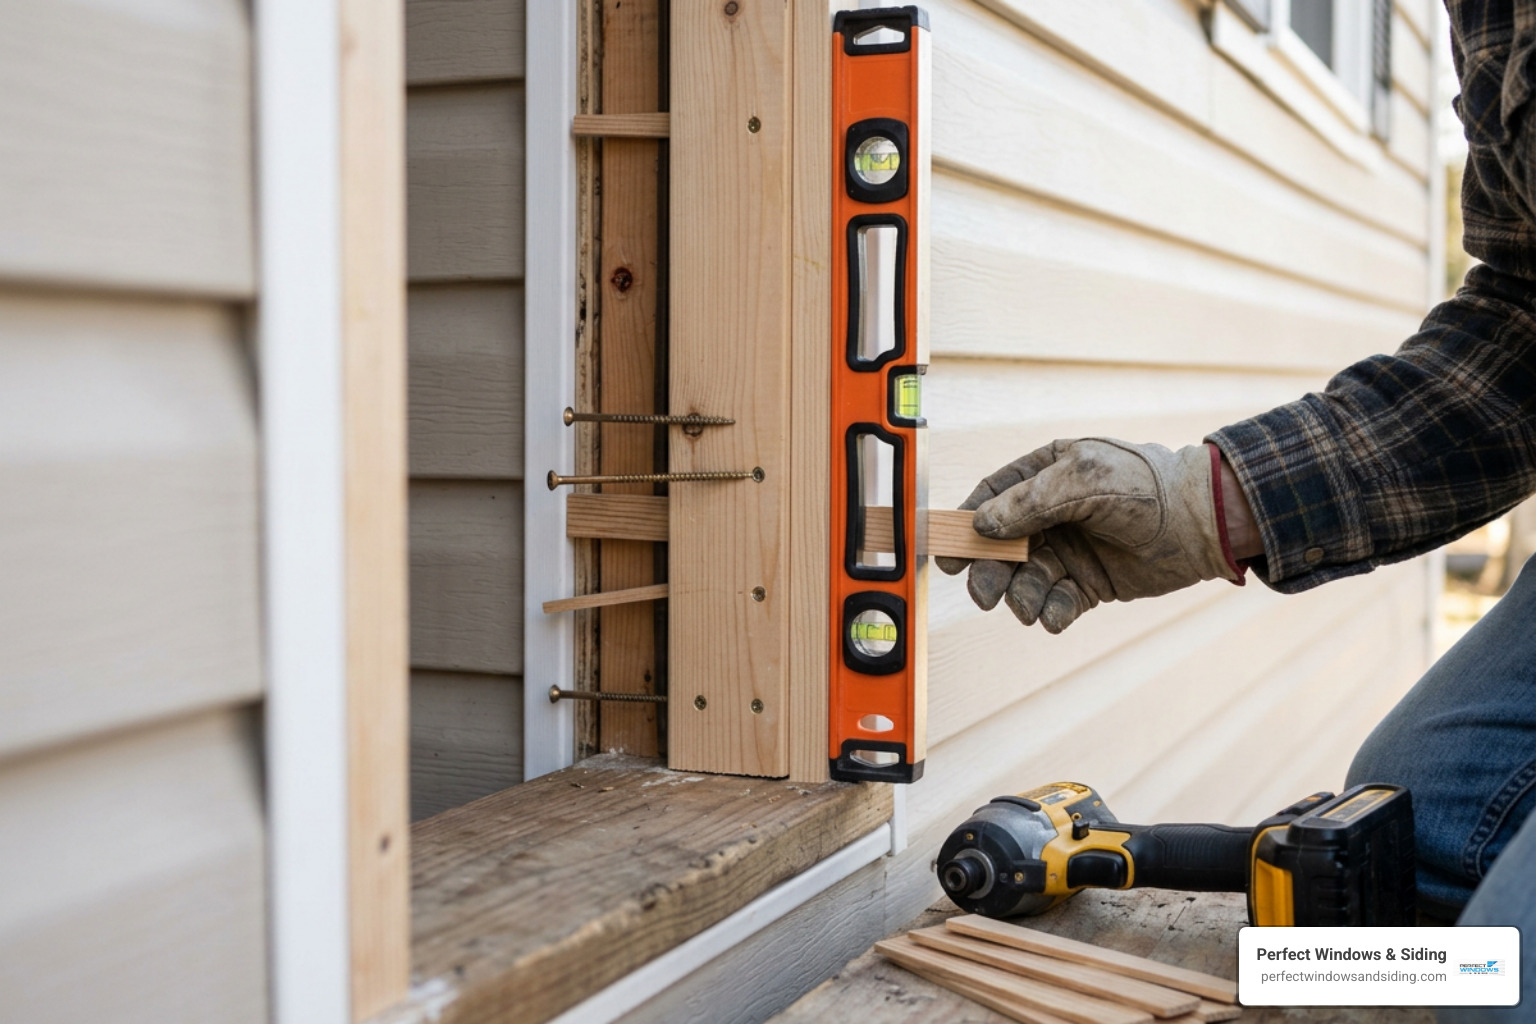
Follow these layout standards, derived from the Traditional frame fitting instructions 2026:
- Fixing count: Install a minimum of 5 structural fixing points down each vertical jamb, and 2 to 3 fixings across the head on openings exceeding 1000mm.
- Corner placement: Position the topmost and bottommost jamb fixings between 100mm and 150mm from the external corners. Fastening closer than 100mm risks splitting the frame corners or cracking brickwork edges.
- Intermediate spacing: Space all intermediate fixings evenly along the jamb at center-to-center distances no greater than 450mm to 500mm.
- Substrate penetration: Fasteners must penetrate a minimum of 50mm into the solid wall substrate (masonry block, brick core, or structural timber studs).
- Staggered alignment: Stagger fixing locations roughly one-third of the jamb’s width inward from alternating edges rather than running them down a single straight line to prevent timber splitting or masonry fracture.
- Hinge reinforcement: Always drive at least one extended heavy-gauge structural screw through the top hinge pocket, bridging through the jamb and shims directly into the structural framing behind it.
Substrate Anchor Engineering: Masonry vs. Timber Studs
Securing an exterior frame into solid masonry versus a dimensional lumber stud wall requires tailored fixings and distinct positioning strategies:
| Installation Feature | Masonry Wall Construction (Brick / Concrete Block) | Timber Stud Framing (Wood Studs / Sheathing) |
|---|---|---|
| Primary Fastener Type | Direct-drive masonry anchor screws (e.g., Multi-Fix/Tapcon) | Heavy-duty structural wood screws (#10 or #12 gauge) |
| Pilot Drilling Requirement | Pre-drilled pilot hole into brick core using carbide masonry bit | Pre-drilled countersunk clearance hole through jamb only |
| Fastener Anchor Target | Centered into solid brick or concrete core (never in soft mortar joints) | Driven firmly into the double jack stud / king stud structural cluster |
| Cavity Management | Fasten through the thermal break into solid structural wythe; never bridge an open cavity | Fasten through rigid structural shims directly into plumb wall framing |
| Thermal & Moisture Isolation | Heavy DPC barrier membrane required between frame and masonry | Self-adhering flashing tape bridging subfloor and stud edges |
Advanced Weatherproofing, Insulation, and Gap Calibration
An exterior door frame serves as a critical break in your home’s thermal envelope. Applying professional flashing systems and calibrated insulation prevents air infiltration and costly water damage to flooring and structural framing. Proper sealing works hand-in-hand with an energy efficient door installation.
Sill Pan Flashing and Air Sealing Execution
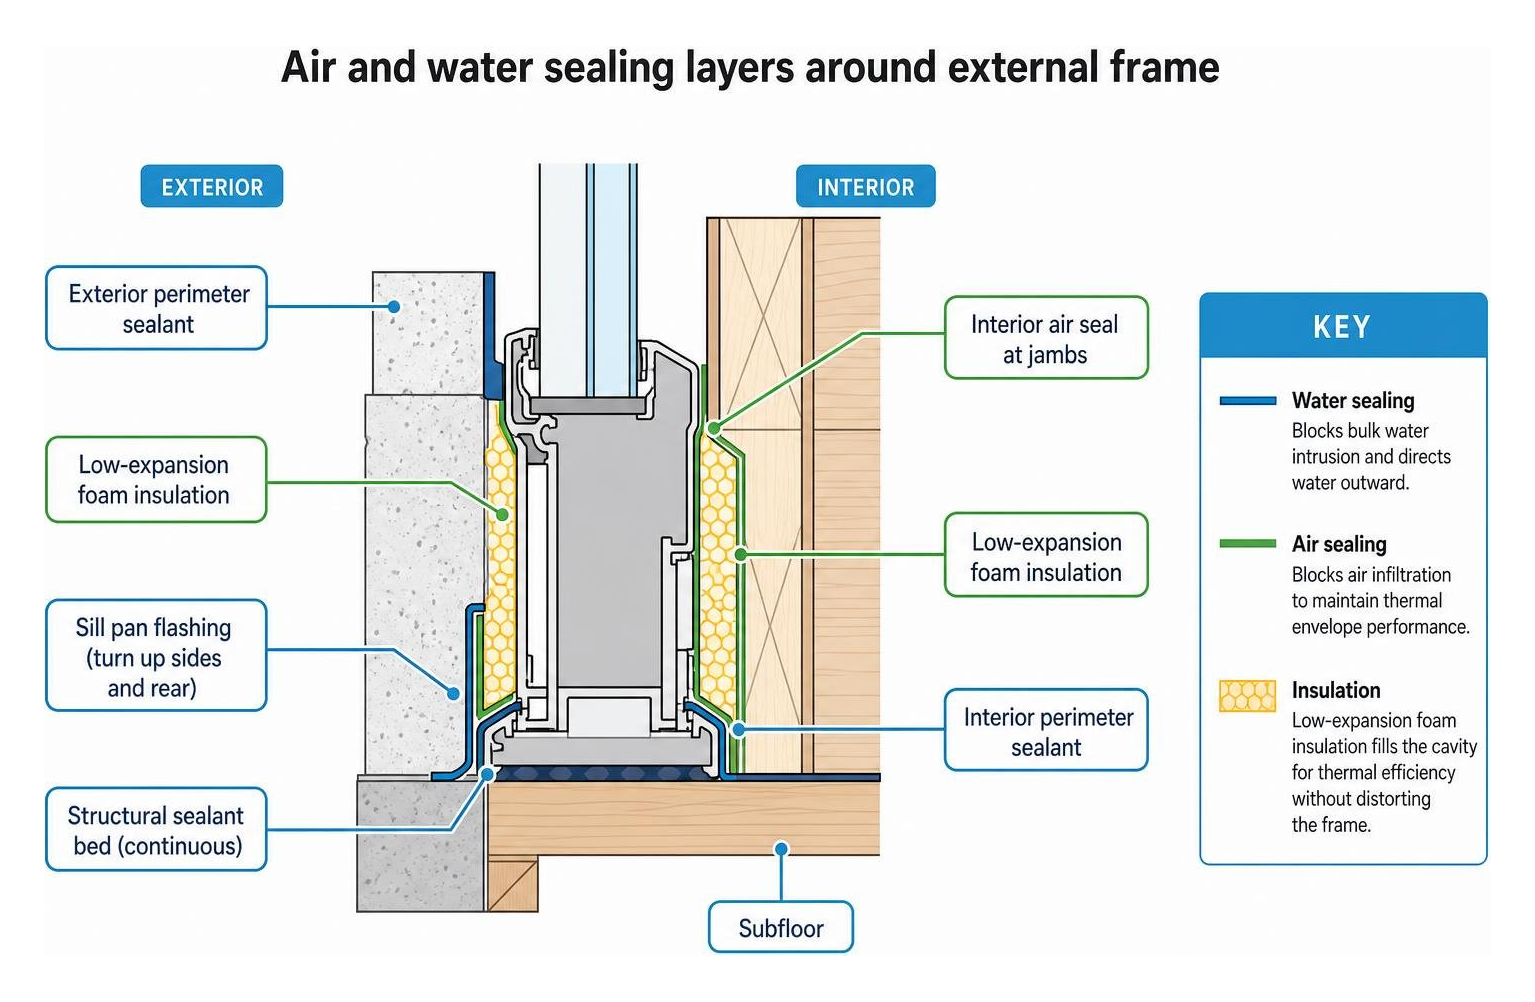
- Install a pre-formed sub-sill pan: Lay a durable, rigid sill pan or form a site-fabricated membrane pan over the subfloor. Turn the pan flashing up 50mm at the rear and side edges to direct any water intrusion outward.
- Apply structural sealant beds: Run three continuous, heavy beads of hybrid elastomeric sealant across the subfloor sill bed before lowering the frame assembly into position.
- Shim solidly beneath load points: Place non-compressible horseshoe packers directly beneath the jamb legs and at 250mm intervals along the sill to establish a level base without sagging under foot traffic.
- Level, plumb, and anchor: Tilt the frame into the aperture, seat the sill first into the sealant bed, plumb the hinge jamb with a 6-foot spirit level, and secure all anchors through solid shims.
- Insulate the perimeter cavity: Inject low-expansion polyurethane foam into the perimeter void between the jambs and structural framing. Unlike standard high-expansion foams that exert heavy pressure during curing, low-expansion formulations fill voids without warping the jambs.
- Use anti-bowing spacers: Insert temporary 3mm spacing shims between the door leaf and the frame rebate during the foam injection and curing phase to maintain consistent operating clearances.
- Exterior perimeter caulking: Once the foam is cured, cut away any excess flush with the jamb exterior. Install closed-cell foam backer rod into gaps wider than 6mm, and tool a smooth bead of exterior-grade neutral-cure silicone or hybrid polymer sealant around the perimeter.
Clearance Tolerances and Smooth Operation in External Door Frame Fitting
After securing and sealing the frame, hang the door slab and verify its operating clearances. Accurate clearances ensure the door compresses its weatherstripping consistently without sticking or binding across seasonal humidity swings:
- Perimeter door gaps: Maintain a uniform gap of 2mm to 4mm between the door leaf vertical edges, head, and frame rebate.
- Threshold operating height: The finished clearance between the bottom underside of the door slab and the finished sill or threshold must not exceed 8mm to ensure fire, smoke, and weather-seal integrity.
- Compressible weatherstripping: When you install door weather stripping, ensure the rubber or foam seal compresses by approximately one-third of its uncompressed depth when the latch engages.
- The tactile tension test: Test seal compression by closing the door onto a paper bill along the perimeter jambs and bottom sweep. The bill should pull out with moderate resistance. If it slides out freely or cannot be pulled without tearing, adjust the adjustable strike plates or hinge shims accordingly.
- Latch calibration: Adjust the strike keep plates using a Torx driver to refine latch engagement, ensuring the door pulls firmly against the weather seals when closed.
Frequently Asked Questions About Exterior Door Frames
What building regulations or controlled fitting rules apply when replacing an external door frame?
Under modern building codes and controlled fitting standards, replacing an external door and frame is classified as a regulated structural alteration. The new assembly must satisfy specific requirements:
- Thermal performance: The complete doorset (frame, slab, and glazing) must meet maximum thermal transmittance (U-value) thresholds to prevent building heat loss.
- Means of escape and accessibility: Replacement frames cannot reduce the original clear opening width of an exit doorway and must maintain compliant, low-profile thresholds where level access is mandated.
- Safety glazing: Any sidelight or transomed frame incorporating glass below 1500mm from floor level must use certified safety glazing (tempered or laminated).
- Certification: In jurisdictions requiring compliance notification, installations must be inspected by local municipal building authorities or certified by a registered competent contractor.
How do I prevent expanding foam from bowing an external door frame?
Expanding foam applies considerable hydraulic force against timber and composite jambs during curing. To prevent frame distortion:
- Use only certified low-expansion polyurethane foam designed specifically for door and window installation.
- Place solid, non-compressible plastic shims directly adjacent to each frame anchor screw before tightening.
- Install temporary 3mm plastic packers or wooden spacer blocks in the rebate between the door leaf and the jamb while the foam cures.
- For wide openings or knockdown frames installed without the door slab hung, install two horizontal timber cross-braces across the frame width at the third-points of the jamb height to maintain true parallel lines.
What is the correct clearance gap between an exterior door slab and frame?
The industry standard perimeter margin between an exterior door leaf and its rebated frame is 2mm minimum to 4mm maximum across the top head and both vertical stiles.
A 3mm gap provides optimal clearance: it allows sufficient room for natural seasonal expansion and contraction in solid timber or composite materials while ensuring full contact and compression across the perimeter weather seals. At the base, the gap between the door bottom sweep and the threshold should not exceed 8mm to keep out drafts, insects, and wind-driven rain.
Conclusion
Precision external door frame fitting requires square opening preparation, sturdy mechanical anchoring into solid structural members, and layered weatherproofing from the sill pan to the exterior perimeter caulk. Taking time to level the sill, space structural anchors at proper intervals, and manage perimeter expansion voids prevents sticking latches, cold winter drafts, and moisture intrusion.
For homeowners throughout Chicago, Des Plaines, Park Ridge, Morton Grove, and surrounding communities seeking flawless craftsmanship and guaranteed performance, working with a seasoned team makes all the difference. With over 20 years of hands-on experience, our licensed and insured installers deliver durable, custom-fitted entryway solutions backed by our comprehensive lifetime warranty.
Contact Perfect Windows & Siding today for an exterior door installation built to protect your home through every season.
Schedule your consultation or Get a free estimate online today.