
Why Proper Wood Window Installation Matters for Your Home
Wood window installation is a critical project that impacts your home’s energy efficiency, durability, and value. A correct installation creates a weather-tight seal, protecting your home from drafts, moisture, and energy loss. The process involves preparing the opening, installing weatherproofing, setting and securing the window, insulating, and finishing the trim.
Wood windows offer timeless beauty, but their performance hinges on installation quality. While DIY can save on labor costs, which can be significant, improper installation can void warranties, cause water damage, and lead to rotting frames. The stakes are high: a poorly installed window can increase energy bills, cause structural damage, and create operational issues. Conversely, a properly installed wood window improves curb appeal, improves comfort, and can last for decades.
I’m Voytek Glab, owner of Perfect Windows & Siding. For over 20 years, I’ve specialized in wood window installation for homeowners across the Chicagoland area. I personally oversee each project to ensure proper flashing, sealing, and weatherproofing techniques that protect your investment. Understanding these critical steps is key, whether you’re doing it yourself or hiring a professional.
, weather-resistive barrier integration, and key measurements like the 1/2\"-1\" width clearance and 1/4\"-1/2\" height clearance between the frame and rough opening - wood window installation infographic")
Find more about wood window installation:
Before You Begin: Planning Your Installation
Before starting your wood window installation, proper planning is essential for a perfect fit and lasting performance.

First, determine if your project is new construction or a replacement, as this affects the installation method. Safety is always the top priority: wear personal protective equipment (PPE) like safety glasses, gloves, and ear protection. For homes built before 1978, be aware of potential lead-based paint and take necessary precautions. Finally, always check with your local building department in Chicagoland, as local codes supersede manufacturer instructions.
Essential Tools and Materials
Having the right tools and materials is crucial for success. Here’s a list of essentials:
Tools:
- Tape measure
- Level (4-foot and torpedo)
- Speed square
- Caulking gun
- Hammer and pry bar
- Power drill
- Circular saw
- Utility knife
- J-roller
- Stapler
- Safety glasses, gloves, and ear protection
Materials:
- Wood window unit
- Composite shims
- High-quality exterior sealant (ASTM C920)
- Self-adhering flashing tape (ASTM D-779)
- Sill pan
- Low-expansion spray foam insulation
- Appropriate fasteners (stainless or galvanized)
- Backer rod
- Exterior grade wood filler
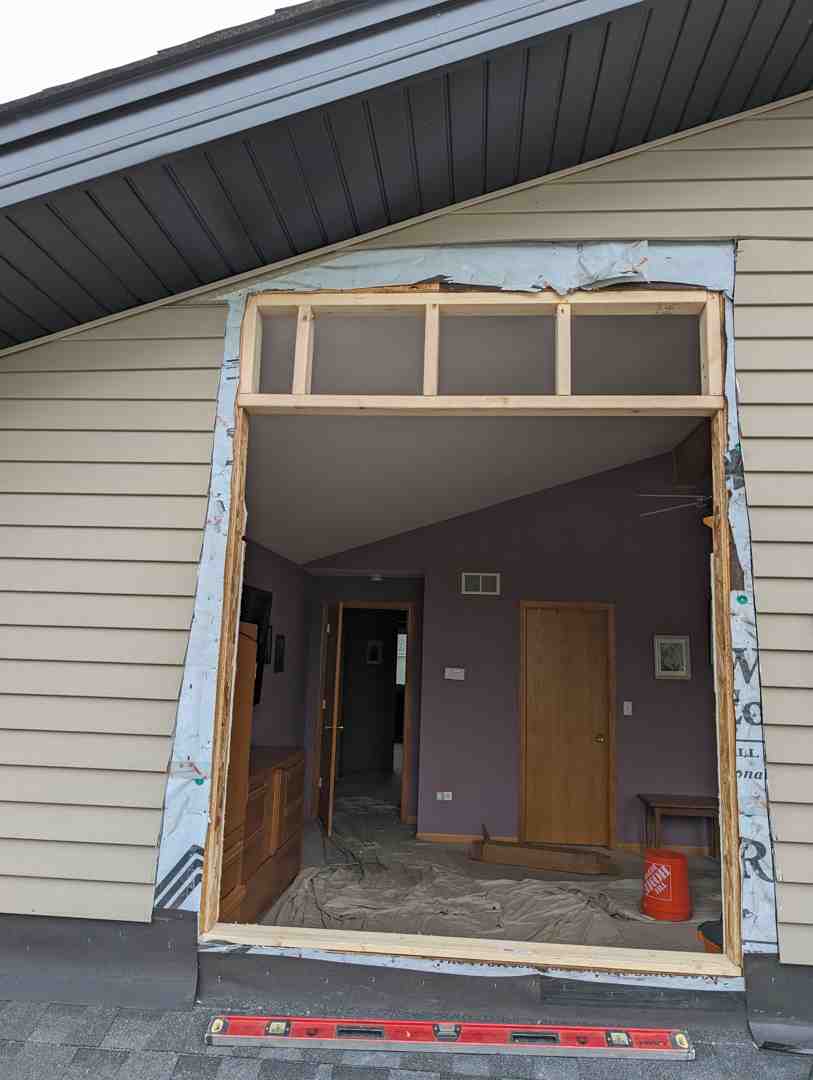
Preparing the Rough Opening
A perfectly prepared rough opening is the foundation of a successful wood window installation.
First, check the dimensions. For wood-framed walls, the rough opening (RO) should be 1 inch wider and 1/2 inch higher than the window frame. For masonry openings (MO), the clearance is tighter: 1/2 inch wider and 1/4 inch higher. This space is vital for shimming, insulation, and adjustment. More info about Custom Sized Windows
Next, verify the opening is square, level, and plumb.
- Square: Measure diagonally corner to corner. The measurements should be equal (within 1/8″ to 1/4″ depending on window size).
- Level: The sill must be flat, not crowned or sagged.
- Plumb: The side jambs must be perfectly vertical, and the exterior face of the opening must be in a single plane.
Finally, inspect the wall sheathing to ensure it provides a solid surface for secure fastening. For stud-framed walls, confirm that minimum double studs support the header at all rough openings.
The Step-by-Step Guide to Wood Window Installation
With the planning and prep work done, it’s time for the wood window installation. This is where precision ensures your windows are beautiful, robust, and weather-tight.

Our goal is to integrate the window with the home’s weather barrier to create a positive drainage plane. Always follow the window manufacturer’s instructions to maintain the warranty. Large or heavy windows require two or more people for safe handling.
Step 1: Weatherproofing the Opening with Flashing
This is the most critical step for preventing leaks. We create a continuous, “shingle-lapped” system that sheds water down and out.
- Install Sill Pan: Place a pre-formed or site-built sill pan over a bead of sealant on the rough sill. It must have upturned legs to direct water to the exterior.
- Apply Flashing Tape: Apply self-adhering flashing tape to the sill, extending it up the jambs. Then, apply vertical strips to the side jambs, overlapping the sill flashing. Finally, apply head flashing across the top, overlapping the side flashing. This shingle-style application ensures water runs off instead of seeping in. A rigid drip cap is often installed over the window casing for added protection.
For a deeper dive into these techniques, you can View Complete Installation Details from manufacturers.
Step 2: Setting, Shimming, and Securing the Window
With the opening weatherproofed, we’re ready to set the window.
- Apply Sealant: Apply a continuous bead of high-quality exterior sealant to the side and head jambs of the opening where the window frame will sit.
- Place and Shim: With a helper, set the window into the opening, resting it on the sill pan. Center the unit and use non-compressible shims to make the frame perfectly level, plumb, and square. Place shims under the jambs, near the corners, at lock points, and every 15 inches to prevent bowing.
- Check for Square: Re-check for square by measuring the frame diagonally. Equal measurements confirm it’s square. Also, check that the reveal (gap between sash and frame) is even all around.
- Fasten the Window: Secure the window into the rough opening. For nailing fins, fasten through the pre-drilled holes. For block frames, fasten through the side jambs and shims into the framing. Use stainless or hot-dipped galvanized fasteners that penetrate at least 1 inch into the wall structure.
Step 3: Checking for Proper Operation
After securing the window, verify that it operates correctly.
- Operate the Sash: Open and close the window multiple times to ensure it glides smoothly without binding.
- Check the Reveal: Re-examine the gap between the sash and frame to ensure it’s consistent.
- Test Locks: Ensure all locking mechanisms engage fully and easily.
- Adjust Shims: If you notice any issues, make minor adjustments to the shims to bring the window into perfect alignment. This ensures your wood window installation is not just sound, but also a joy to use. More info about Home Window Repair Guide 2025
The Finishing Touches: Sealing and Insulating
Once your wood window is secure and operating smoothly, the final phase is to seal and insulate it. This creates an impenetrable barrier against the elements, ensuring maximum energy efficiency and comfort for your Chicago home.
Proper air sealing is paramount to prevent drafts, block moisture, and lower heating and cooling costs. This step protects your home’s structure and maximizes your investment.
Sealing and Insulating for a Professional wood window installation
A professional wood window installation is incomplete until every gap is sealed.
- Apply Low-Expansion Foam: From the interior, apply a continuous bead of low-expansion polyurethane foam into the gap between the window frame and the rough opening. Use only low-expansion foam to avoid bowing the frame.
- Use Backer Rod: For gaps larger than 1/2 inch, insert a backer rod before sealing to ensure a proper sealant bead shape and performance.
- Apply Interior Sealant: Apply an interior sealant bead where the window frame meets the interior wall for a clean finish and an extra layer of air sealing.
- Install Exterior Trim and Drip Cap: Install exterior trim if needed. Above the window, install a rigid drip cap that extends beyond the trim to shed water away.
- Final Exterior Caulking: Apply a high-quality exterior sealant (Grade NS Class 25 per ASTM C920) around the entire perimeter where the exterior trim or frame meets the siding. This creates a final watertight seal.
Following these steps ensures your new wood windows are beautiful, energy-efficient, and protected. More info about Energy Efficient Window Replacement
Advanced Scenarios and Common Challenges
While the basic steps for wood window installation are consistent, real-world projects often present challenges. Different construction types and cladding materials require specific approaches.
| Exterior Cladding | Installation Adjustments |
|---|---|
| Siding (Wood/Vinyl) | If using a renovation window that mounts from the outside, you may need to cut away existing siding to accommodate a wider trim profile. Ensure weather barrier integrity. For wood siding, extra steps might be required compared to vinyl. Always ensure proper flashing integration with the building wrap. |
| Brick Veneer | Crucial to avoid “brick bind.” Maintain at least 1/2 inch (13mm) between the bottom of the window sill and the top row of brick. Masonry openings require specific sizing (1/2″ wider, 1/4″ higher than frame/casing). Use structural masonry clips for fastening, often with specific screw types (#8 x 1 5/8″ screws). |
| Stucco (EIFS) | Installation in Exterior Insulation and Finish Systems (EIFS) is highly specialized. It’s critical to understand if it’s a barrier or water-managed EIFS system. Manufacturer-specific procedures for water-managed systems must be followed, and installation into barrier EIFS without these procedures can void warranties. Often requires specific flashing and sealant details. |
Addressing out-of-square openings requires careful shimming, while different wall structures (masonry vs. wood-frame) demand different fastening methods.
Installation Methods: Nailing Fin vs. Block Frame
The choice between a nailing fin and a block frame window significantly impacts the wood window installation process.
-
Nailing Fin Installation: Typically used in new construction or full tear-outs. The window has an integrated flange (fin) and is installed from the exterior before the final cladding is applied. Sealant is applied to the back of the fin, the window is set and secured by fastening through the fin into the framing, and flashing tape is applied over the fin to integrate with the weather barrier.
-
Block Frame (No Fin) Installation: Common in replacement projects. The new window unit, which lacks a fin, is inserted into the existing, prepared opening. It is shimmed to be plumb and level, then fastened directly through the side jambs into the existing framing. This method is often less disruptive to exterior siding.
Choosing the right method depends on your project’s needs. Our Residential Window Installation Services can guide you to the best approach.
Adapting to Exterior Cladding and Wall Type
Your home’s exterior cladding and wall type influence the installation, especially weatherproofing and fastening.
- Wood Siding: May require carefully cutting away siding for a clean opening and ensuring proper integration of flashing with the building wrap underneath.
- Brick Veneer: The key is to prevent “brick bind” by leaving at least a 1/2-inch gap between the window sill and the brick below. Fastening typically requires structural masonry clips.
- Stucco (EIFS): This presents unique water management challenges and requires specialized flashing and sealant details to integrate with the stucco system and maintain the warranty.
- Masonry vs. Wood-Framed Walls: In wood-framed walls, windows are fastened to studs. In masonry walls, a wood subframe (buck) is often installed first, or specialized clips are used to anchor the window directly into the masonry.
Our expertise in Windows and Siding is invaluable for ensuring your wood window installation is perfectly suited to your home’s construction.
DIY vs. Professional: Making the Right Choice
The decision to DIY a wood window installation or hire professionals is significant. While the allure of saving on labor costs is strong, it’s crucial to weigh the benefits against the risks.
Perceived simplicity can be misleading. Wood window installation requires a specific skill level, a full set of tools, and a considerable time commitment. Improper installation carries substantial risks: it can void your window’s warranty, lead to costly water damage, and cause air leaks that negate the energy efficiency benefits. As manufacturers state, failure to follow instructions or install into a square, level, and plumb opening can result in denied warranty claims.
When should you call a professional? We believe professional installation is the best choice for most homeowners, especially for:
- Complex projects involving large, custom, or bay windows.
- Installations in challenging exteriors like brick or stucco.
- Working with masonry walls or in older homes with potential lead paint.
- Installations where the sill is higher than 35 feet above ground.
- If you lack the experience, tools, or time for a meticulous job.
Professional installers also offer workmanship warranties, providing an extra layer of peace of mind.
Key Considerations for a DIY wood window installation
If you’re still contemplating a DIY wood window installation, be fully informed about what it entails.
- Project Complexity: A single window might seem manageable, but multiple windows or different types add complexity. The details of flashing, shimming, and sealing are crucial.
- Personal Experience: A solid background in carpentry and an understanding of building science (how air and moisture move) are vital. An inexperienced DIYer might miss structural issues.
- Availability of a Helper: Large wood windows are not a one-person job. You will need a capable partner for safe lifting.
- Understanding Building Science: You must understand positive drainage planes and how to layer flashing. Simply caulking a window is not enough and can trap water.
- Potential for Costly Mistakes: While DIY saves on labor, mistakes can be expensive. An incorrect measurement, improper flashing, or a bowed frame can lead to costly repairs that erase any initial savings.
If you’re unsure, seeking professional help is a wise investment in your home’s long-term value and integrity. More info about Window Replacement Cost Near Me
Frequently Asked Questions about Wood Window Installation
How much of a gap should be around a window rough opening?
A typical rough opening for wood window installation should be 1/2 inch to 1 inch wider and 1/4 inch to 1/2 inch taller than the outside measurement of the window frame. This allowance provides essential space for shimming the unit to be perfectly plumb and level, and for applying low-expansion foam insulation to create an airtight seal. For masonry openings, the clearance is usually a bit tighter: 1/2 inch wider and 1/4 inch higher than the frame and casing.
What is the most critical step for preventing leaks?
The most critical step for preventing leaks during wood window installation is proper flashing. This involves creating a continuous, shingle-lapped water management system around the rough opening. This system includes installing a sill pan with upturned legs, followed by self-adhering flashing tape applied to the sill, jambs, and head in an overlapping fashion. This ensures that any water that penetrates the exterior cladding is directed away from the window opening, protecting your home from moisture intrusion.
Can I install a wood window in a brick wall myself?
Installing a wood window installation in a brick or masonry wall is significantly more complex than in a wood-framed wall and is generally not recommended for DIYers. It requires specialized tools, fasteners (like structural masonry clips), and a deep understanding of how to properly seal against masonry to prevent water intrusion and “brick bind.” The process involves different rough opening dimensions, precise measurements to avoid contact between the window sill and brick, and often the installation of a wood buck. This type of project is often best left to experienced professionals who understand the nuances of masonry construction and specific flashing techniques required for long-term performance and warranty compliance.
Conclusion
The art of wood window installation is a blend of precision, proper technique, and meticulous attention to detail. From the initial planning and preparing the rough opening to the careful setting, shimming, and securing of the window, each step plays a vital role in the overall performance and longevity of your investment. We’ve explored the critical importance of weatherproofing with flashing, the necessity of thorough sealing and insulation, and the varying approaches required for different installation methods and exterior claddings.
The value of a perfect fit cannot be overstated. A properly installed wood window not only performs flawlessly, keeping your home comfortable and energy-efficient, but it also significantly improves its curb appeal and overall value. While the idea of a DIY installation might be tempting for the cost savings, the complexities, potential for costly mistakes, and warranty implications often make professional installation the wiser choice.
For homeowners in the Chicago area seeking a flawless, warrantied wood window installation, the expert team at Perfect Windows & Siding provides peace of mind and exceptional results. With over 20 years of experience, we pride ourselves on our commitment to quality, custom solutions, and personalized customer service, ensuring your beautiful wood windows are installed to perfection.
Get a professional quote for your Chicago window installation