
Why Cement Board Replacement is Essential for Your Home’s Protection
Cement board replacement becomes necessary when your home’s protective barrier starts failing. Whether you’re dealing with cracked exterior siding or deteriorating bathroom substrates, knowing when and how to replace cement board can save you thousands in water damage repairs.
Quick Answer: When to Replace Cement Board
- Visible cracks or crumbling sections
- Water stains or moisture damage behind the board
- Soft spots when you press on the surface
- Mold growth or persistent musty odors
- Warping or bulging that creates gaps
The good news? Cement board replacement is a manageable DIY project. Traditional cement boards cost between $4 to $6 per square foot, making it an affordable way to protect your home. The key is recognizing the signs early. As one homeowner found when tiles ripped up their cement board during removal, it’s often easier to start fresh than to patch damaged sections.
The replacement process involves four main steps: safely removing old boards, preparing the wall surface, installing new cement board with proper spacing, and waterproofing the seams. Each step requires specific tools and techniques, but none are beyond the skills of a careful DIYer.
I’m Voytek Glab, and in my 20+ years of exterior remodeling work across Chicagoland, I’ve seen countless cement board replacement projects – from simple bathroom updates to full siding overhauls. My hands-on experience has taught me that proper installation techniques make the difference between a repair that lasts decades and one that fails within months.

When to Replace vs. Repair Your Cement Board
Here’s the reality I’ve learned from countless projects: when homeowners ask whether to patch or replace their cement board, replacement is almost always the better choice. I know it might seem like more work upfront, but trying to patch damaged cement board is like putting a band-aid on a broken bone.
Water damage is the usual culprit. While cement board won’t rot like wood, water can get behind it and damage your wall studs and framing. Once water finds its way in, it rarely leaves on its own.
I’ve seen too many homeowners find soft spots when they press on their cement board – that spongy feeling means the board’s integrity is shot. And when mold growth starts appearing, especially with that persistent musty smell, you’re looking at a moisture problem that goes way deeper than the surface.
Crumbling and deterioration happens over time, particularly in harsh Chicago winters. The freeze-thaw cycles can be brutal on any building material. When cement board starts breaking down into a powdery mess, it can no longer provide the stable foundation your tiles or siding need.
But here’s what really drives the decision: underlying structural issues. Often, the damaged cement board is just telling you about bigger problems hiding behind it – rotted studs, compromised framing, or water damage you can’t see yet.
| Replacing Cement Board | Patching Cement Board |
|---|---|
| Pros: Creates perfectly flat surface, addresses root problems, provides lasting foundation, better waterproofing | Pros: Faster for tiny damage, lower initial material cost |
| Cons: More labor intensive, higher upfront cost, requires more tools | Cons: Creates uneven surfaces, hides underlying issues, leads to future failures |
| Best for: Water damage, mold, warping, structural concerns | Best for: Very minor surface damage only |
The math is simple: patching might save you a few hours today, but cement board replacement saves you from doing the job twice.
Signs That Point to Full Replacement
Some signs leave no room for debate. When you see these red flags, it’s time for a complete replacement.
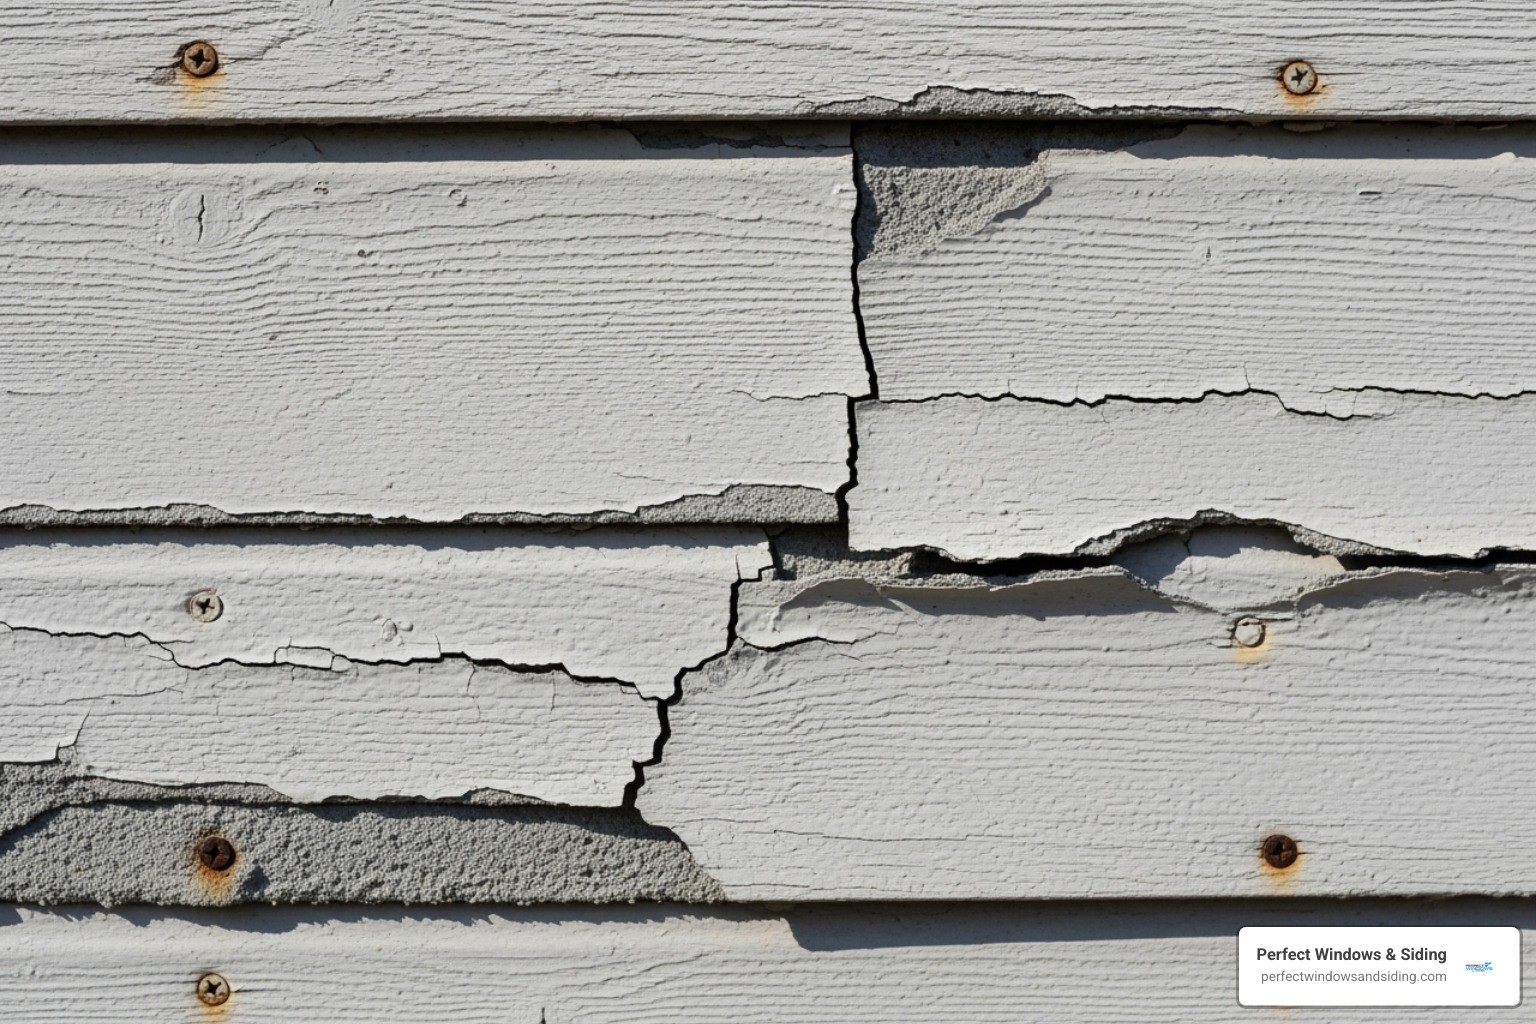
Visible cracks are the most obvious warning sign, but I’m not talking about tiny hairline cracks. Look for wide, deep cracks or that spiderweb pattern that spans several feet. These usually mean the board has shifted or the underlying structure has moved.
Warping or bulging tells a clear story – water has gotten behind your cement board and is causing havoc. Cement board should stay perfectly flat and rigid. When it starts looking like a funhouse mirror, moisture has compromised either the board itself or the framing behind it.
For exterior applications, loose siding panels are a serious concern. If your cement board siding rattles in the wind or you can see gaps opening up, your home’s protective envelope is compromised. Wind-driven rain and our infamous Chicago weather will find every weakness.
Moisture intrusion behind the board might be the most dangerous sign because it’s often invisible until you start removing things. Even if the surface looks okay, dampness behind the board means your waterproofing system has failed somewhere.
This kind of comprehensive upgrade is exactly why new siding is worth the investment – you’re not just fixing a problem, you’re preventing future ones.
The Importance of the Underlying Structure
Think of cement board like the drywall in your living room – it’s only as good as the studs holding it up. I’ve seen beautiful tile jobs fail because someone skipped checking what was behind that old cement board.
Inspecting wall studs is non-negotiable once you remove the old board. Every single stud gets a thorough examination for rot, pest damage, or structural weakness. A compromised stud means your screws won’t hold properly, and your new installation will eventually fail.
Checking for wood rot becomes critical in moisture-prone areas like bathrooms and exterior walls. Rotted wood feels soft and often has that distinctive musty smell. If rot has set in, those studs need repair or replacement before any new cement board goes up.
Ensuring a plumb and flat surface might sound boring, but it’s absolutely crucial for success. Modern cement board follows the contours of whatever it’s attached to. If your studs are wavy or out of plumb, your new board will be too – and good luck getting tiles to lay flat on a crooked surface.
The frame’s condition dictates whether your cement board replacement will be a success or a future headache. This behind-the-scenes work isn’t glamorous, but it’s what separates a repair that lasts decades from one that fails in a few years.
Skip the structural prep work, and you’re basically building a house on quicksand – it might look good initially, but it won’t stay that way for long.
Gearing Up: Tools, Materials, and Project Costs
Before starting your cement board replacement, get properly equipped. Having the right tools and materials on hand makes the project smoother and helps you budget wisely, avoiding extra trips to the hardware store.

Essential Tools and Materials for the Job
For tools, you’ll need a pry bar to gently coax those stubborn old boards away from the wall without damaging the framing underneath. A drill with driver bits makes quick work of removing and installing screws. Your utility knife becomes your best friend for scoring cement board, making clean breaks much easier.
A jigsaw with a carbide blade handles the curves and intricate cuts. Fair warning: cutting cement board creates a surprising amount of dust, so a dust mask (N95 or better) isn’t optional – it’s essential for protecting your lungs. The same goes for safety glasses and work gloves.
You’ll also want a 1/4-inch notched trowel for spreading thin-set mortar evenly. The notched side creates perfect ridges that help everything stick properly. Round out your toolkit with a tape measure, straightedge, and chalk line for accurate measurements and placement.
Material-wise, start with your new cement board in the appropriate thickness for your project. Corrosion-resistant cement board screws are non-negotiable – regular screws will rust and fail over time. These should go in slightly below the surface, positioned at least half an inch from the edge but no more than two inches.
Don’t forget thin-set mortar for bonding and joint filling (allow 24 to 48 hours for proper curing), fiberglass mesh tape to reinforce those joints and prevent cracking, and a waterproofing membrane for wet areas. Cement board resists water but isn’t completely waterproof.
Exploring Alternatives to Traditional Cement Board
The building materials world keeps getting better, and 2025 offers some fantastic alternatives to traditional cement board. The cement board market is growing rapidly, projected to jump from $8.15 billion in 2024 to $8.6 billion in 2025, largely because manufacturers keep innovating.
Fiber cement backer board (like Hardie Backer) offers exceptional durability and achieves a Class A fire rating. It’s heavier than some alternatives, making installation more labor-intensive, but many professionals swear by its consistent quality. For exterior applications, you can learn more about Hardie Board Siding Installation on our website.
Magnesium oxide (MgO) boards are lightweight, fire-resistant, and highly resistant to moisture and mold. Made from recyclable materials, they also offer good insulation and soundproofing, though their upfront cost is higher than traditional options.
Foam boards like Wedi Board or KerdiBoard are game-changers for weight-conscious projects. You can cut them with a simple utility knife, they offer excellent insulation, and many come with integrated waterproofing. They’re perfect for shower walls and custom elements, though they cost more and aren’t as durable as fiber cement options.
Glass mat gypsum boards such as DensShield feature a fiberglass-reinforced core that provides superior strength and moisture resistance. DensShield even includes a built-in moisture barrier, eliminating additional waterproofing steps in some applications. Just wear protective gear during installation to avoid skin irritation from the fiberglass.
For dry areas only, plywood remains a cost-effective option. It’s affordable, readily available, and easy to work with. However, it’s completely unsuitable for wet areas due to susceptibility to water damage, mold, and rot.
Cost Implications of Cement Board Replacement
Let’s talk real numbers because budgeting matters. Cement board replacement costs vary significantly based on your approach and material choices.
Traditional cement boards run $4 to $6 per square foot for materials, making them quite affordable. Premium alternatives like fiber cement backer board jump to $6 to $13 per square foot. Specialty products like magnesium oxide boards, glass mat gypsum boards, and foam boards generally cost more upfront but may offer specific benefits worth the investment.
Labor is a key factor. Cement boards are heavy and require special cutting tools, increasing installation time. A DIY approach saves on labor costs but requires time and the right tools. Professional installation offers expertise, efficiency, and warranties on workmanship.
Here in Chicagoland, we’ve seen countless homeowners initially choose patching to save money, only to call us months later for a complete replacement. While patching might seem cheaper initially, it rarely creates the flat, stable surface needed for long-term success. When patches fail, you’re looking at more expensive repairs, potential water damage, and the frustration of redoing the entire project.
Starting fresh with full cement board replacement costs more upfront but provides a solid, long-lasting foundation. It’s an investment in your home’s integrity that pays for itself through avoided future repairs.
Your Step-by-Step Guide to Cement Board Replacement
Now for the exciting part: changing damaged walls into a solid foundation. I’ll walk you through each step, sharing techniques refined over 20+ years of installations in Chicagoland. Cement board replacement is methodical; follow these steps carefully for professional-quality results that will protect your home for years.

Step 1: Safe Removal of Old Boards
Think of this step as surgery – you want to remove the damaged material while keeping everything healthy intact. Rushing through removal often creates more work later.
Safety comes first, always. Put on your safety glasses, dust mask, and work gloves before you touch anything. Cement board dust isn’t something you want in your lungs, and sharp edges are everywhere during removal.
Clear your work area completely and lay down drop cloths. If you’re working in a bathroom, turn off the water supply. Remove any outer finishes first – whether that’s tile, siding, or paint. For tile, carefully chip it away with a hammer and chisel. For siding panels, unscrew or gently pry them off.
Next, locate all the fasteners holding your cement board in place. These are usually screws or nails driven into the studs. Start removing these systematically, working from one corner toward the other.
Use your pry bar gently but firmly to pull the damaged sections away from the wall. Start at the edges or wherever the board looks most compromised. If a section won’t come free easily, you probably missed a fastener.
As each section comes off, inspect the exposed wall cavity immediately for hidden problems like mold, wood rot, or pest damage. It’s crucial to find these issues now, rather than after your new installation is complete.
Step 2: Preparing the Wall Surface
With the old board gone, you’re looking at the bones of your wall. A little extra time here saves massive headaches later.
Clean everything thoroughly. Use a shop vacuum to remove all debris, old fasteners, and dust. You want a completely clean surface to work with. Any leftover material can create bumps or weak spots in your new installation.
Now comes the detective work. Inspect every single stud for signs of damage. Look for soft spots that might indicate rot, dark stains that suggest water damage, or any structural weakness. If you find compromised studs, they must be repaired or replaced before you continue. This might mean sistering a new piece of lumber alongside a damaged stud or replacing it entirely.
The most critical part of preparation is ensuring your framing is perfectly flat and plumb. Use a long level or straightedge to check each stud. Modern cement board installations demand precision – unlike old-school tile jobs where thick mortar beds could compensate for crooked walls.
If you find bowed or uneven studs, use wooden shims to bring them into the same plane. This attention to detail is the difference between a professional result and a frustrating DIY disaster.
Step 3: Installing New Cement Board
This is where your preparation pays off. With a clean, flat surface, installing new cement board becomes surprisingly straightforward.
Measure twice, cut once. Measure each area carefully, then use your utility knife to score the cement board along your cut lines. Snap it cleanly over a straight edge. For curves or complex cuts, your jigsaw with a carbide blade will handle the job beautifully. Don’t forget your dust mask!
For maximum stability, apply a thin layer of thin-set mortar to the studs or subfloor using your 1/4-inch notched trowel. This creates an incredibly strong bond and helps flatten out any minor imperfections.
Press each board firmly into place, making sure it sits flat. A crucial detail many DIYers miss: proper expansion gaps are non-negotiable. Leave a 1/4-inch gap between the cement board and adjacent walls, and a 1/8-inch gap between individual sheets. These gaps allow for natural expansion and contraction, preventing cracks.
If you’re working near a tub or shower, leave a 1/4-inch gap between the tub edge and your board to prevent moisture wicking.
Secure everything with corrosion-resistant cement board screws every 6-8 inches around the perimeter and through the field. Keep screws at least 1/2-inch from edges but no more than 2 inches. Drive them just slightly below the surface.
Step 4: Finishing and Waterproofing the Seams
The final step transforms your individual boards into one continuous, waterproof surface.
Apply thin-set mortar generously over all joints using the flat side of your trowel. Extend the mortar about 1 1/2 inches on each side of every joint.
While the mortar is still workable, embed fiberglass mesh tape directly into it, centered over each joint. Press it down firmly to ensure complete contact. This tape is your insurance policy against future cracks.
Apply another thin coat of mortar over the tape, then feather the edges with your trowel to create seamless transitions. The goal is a perfectly smooth surface ready for your finish materials.
For wet areas like showers, apply a liquid waterproofing membrane once everything has dried completely (usually 24-48 hours). Products like RedGard create a continuous waterproof barrier over your entire installation. Cement board is water-resistant, not waterproof.
Allow everything to cure fully before moving on to tiling or other finishes. Patience here ensures your cement board replacement will protect your home for decades.
Frequently Asked Questions about Cement Board
Here are answers to the most common questions about cement board replacement, based on over 20 years of experience.
Do I always need a waterproof membrane with cement board?
This is a critical question. The surprising answer for many homeowners is that cement board is water-resistant, not waterproof. Think of it like a tough sponge – it won’t fall apart when wet like drywall, but water can still pass through it.
A waterproofing membrane protects your wood framing from moisture, which is essential for preventing rot and expensive structural repairs. The membrane creates a barrier that stops water from reaching the studs behind your cement board.
It’s essential in wet areas like showers – no exceptions. Whether you choose a liquid or sheet membrane, this step is non-negotiable for tub surrounds, shower walls, and steam rooms.
For exterior walls, we recommend it too, especially in the Chicago area. Even though your siding provides the first line of defense, a membrane behind your cement board gives you extra protection against moisture that finds its way in.
For dry areas, you can probably skip the membrane. But when in doubt, it’s cheap insurance compared to dealing with water damage later. Boards can be non-combustible as tested by ASTM E136, which adds another safety benefit to your installation.
How thick should my cement board be?
The thickness depends on where you’re installing it and what you’re putting on top of it.
Standard thicknesses are 1/4-inch and 1/2-inch. 1/4-inch is perfect for floors and some backsplashes where you don’t want to add too much height. This thinner option gives you a solid substrate without creating awkward transitions with adjacent flooring.
1/2-inch is our go-to for walls because it matches the thickness of standard drywall perfectly. This creates seamless transitions at corners and edges, making your tile installation look professionally finished.
Always check the manufacturer’s specifications for your specific application. They will tell you the best thickness for your project. For any cement board replacement, we always verify these specs before ordering.
Can I install new cement board over an old layer?
I’ll be straight with you – this is not recommended, even though it might seem like a time-saver. It’s just not worth the risk.
It adds excessive weight and thickness to your walls, which can stress your framing and create awkward transitions with adjacent surfaces like door casings and trim.
More importantly, it can trap moisture and hide underlying structural damage. If you needed to replace the cement board due to water damage or mold, covering it up doesn’t solve the problem. It just hides it until it becomes a much bigger, more expensive issue.
Starting with a clean, flat surface is always best practice for a lasting installation. Removing the old board completely allows you to inspect your framing, address any issues, and build your new installation on a solid foundation. That’s the difference between a repair that lasts 20 years and one that fails in two.
When we do a cement board replacement, we always tear out to the studs. It’s the only way to guarantee a quality installation that will protect your home for decades.
Conclusion: A Solid Foundation for Your Home’s Exterior
You’ve now journeyed through the complete cement board replacement process. What may have started as damaged, crumbling boards can now become a rock-solid foundation for your home. The value of a proper replacement isn’t just visual; it’s knowing you’ve addressed moisture problems, prevented future water damage, and created the perfect substrate for your new siding or tile.
Of course, we completely understand that not every homeowner wants to spend their weekends wrestling with cement boards and thin-set mortar. Some folks prefer to leave the dusty work to the professionals while they focus on the fun parts of homeownership.
For homeowners throughout the Chicagoland area, Perfect Windows & Siding brings over two decades of expertise to every cement board replacement project. We’ve seen it all – from minor moisture issues caught early to major structural repairs that required complete wall reconstruction. Our team knows exactly what to look for, how to address underlying problems, and how to ensure your new installation will last a lifetime.
Whether you’re in Chicago, Des Plaines, Wilmette, Hinsdale, or any of our neighboring communities, we’re your local partners in home protection. We believe in doing the job right the first time, using quality materials, and backing our work with warranties that give you real peace of mind.
Ready to explore professional installation? Learn more about our comprehensive siding replacement in Chicago services and find how we can transform your home’s exterior with the expertise that comes from being your trusted local contractors.