
Why Hanging a Prehung Exterior Door Is One of the Best Home Upgrades You Can Make
Learning how to hang a prehung exterior door is one of the most impactful home improvement projects you can tackle in 2026 — especially here in the Chicago area, where harsh winters and wind-driven rain put every entry point to the test.
Here’s a quick overview of the process:
- Prepare the rough opening — check for level, plumb, and square; level the subfloor
- Install the sill pan and flashing — apply sealant beads and flash in shingle fashion for waterproofing
- Set, shim, and plumb the door frame — dry-fit the unit, shim hinge side first, verify reveal on all sides
- Fasten the frame securely — predrill and drive screws through shims into framing; reinforce hinges
- Adjust the sill and weatherstripping — use the dollar bill test to confirm a proper seal
- Insulate and seal the perimeter — low-expansion spray foam, exterior caulk, and drip cap
A properly installed prehung exterior door can reduce air leakage by up to 30% compared to an older, poorly sealed door — and save you an average of $100–$200 per year on heating and cooling costs.
But getting those results depends entirely on how well the door is installed, not just which door you buy. A great door installed poorly is still a problem waiting to happen.
That’s where this guide comes in.
I’m Voytek Glab, owner of Perfect Windows & Siding, and I’ve spent over 20 years installing and overseeing exterior door installations across the Chicagoland area — including projects where a single missed step in flashing or shimming led to costly water damage down the road. In this guide, I’ll walk you through exactly how to hang a prehung exterior door the right way, so your install lasts for decades.

Hang a prehung exterior door terms to remember:
- composite front doors supplied and fitted
- Exterior Door Installation
- exterior door weather stripping installation
Understanding Prehung Exterior Doors
Before we pick up a hammer or a drill, let’s clear up a common point of confusion: the difference between a slab door and a prehung door.
A slab door is just the door panel itself. It doesn’t come with a frame, hinges, or pre-cut holes for your lockset. Installing a slab door requires advanced carpentry skills, as you must mortise the hinges, chisel out the strike plate, and perfectly trim the door to fit an existing, often warped, frame.
A prehung unit, on the other hand, is a complete factory-assembled system. It includes the door slab already hung on its hinges within a fully constructed three-sided frame (the jamb), complete with an integrated threshold (sill) and weatherstripping.
| Feature | Slab Door | Prehung Door Unit |
|---|---|---|
| Components Included | Door slab only | Door slab, jamb, hinges, threshold, weatherstripping |
| Ease of Installation | High difficulty (requires mortising and precise trimming) | Moderate difficulty (requires leveling and shimming the unit) |
| Weather Protection | Depends entirely on manual weatherstrip application | Built-in, factory-sealed weatherstripping and threshold |
| Best For | Replacing a door panel in an undamaged, perfectly square frame | New construction, structural updates, or replacing rotted frames |
| Structural Integrity | Relies on the old frame’s condition | Provides a fresh, structurally sound frame integrated with the wall |
When planning an Exterior Door Replacement, opting for a prehung door is almost always the smarter path, especially for exterior entryways exposed to the brutal elements of the Chicago suburbs.
Why Choose to Hang a Prehung Exterior Door Over a Slab?
If you are tackling this as a home improvement project, choosing to hang a prehung exterior door offers several distinct advantages over trying to fit a slab door:
- Superior Weatherproofing: Because the weatherstripping and threshold are integrated at the factory, you get a tight, continuous seal that is incredibly difficult to replicate by hand.
- Guaranteed Alignment: The door is already perfectly aligned within its frame. You do not have to worry about mortising hinges at the exact depth or angle.
- Energy Efficiency: Homes with well-installed exterior doors and proper weatherstripping experience up to 50% less air infiltration around the door perimeter.
- Structural Durability: If your old door frame has shifted, warped, or suffered from hidden moisture damage, installing a prehung unit allows you to remove the compromised framing entirely and start fresh.
According to the door experts at How to Install a Prehung Door – Advice From Bob Vila, starting with a prehung unit eliminates the tedious, highly technical carpentry work, allowing you to focus on what matters most: aligning, shimming, and sealing the unit to the rough opening.
Preparation and Essential Tools
The secret to a flawless door installation isn’t actually what you do once the door is in the opening; it’s the preparation work you do beforehand. You need to verify that your rough opening is ready to receive the new unit and gather the proper high-quality tools.
One of the most common installation mistakes we see in places like Park Ridge and Morton Grove is attempting to hang a door with a cheap, warped level or incorrect fasteners. If your frame isn’t plumb, your hinges will bind, your latch won’t align, and your weatherstripping won’t seal. For a deep dive into how hinges affect door movement, check out A Swing and a Hit: The Ultimate Guide to Installing Door Hinges.
Essential Tools and Materials Needed to Hang a Prehung Exterior Door
Don’t start this project with the door removed and a giant hole in your house only to realize you’re missing a critical item. Here is your checklist:
- 6-foot level: A shorter level (like a 2-foot or 4-foot) cannot accurately measure the entire height of the jamb. A 6-foot level is non-negotiable for getting the frame perfectly plumb.
- Caulk gun & high-quality sealant: Use a premium window and door polyurethane or elastomeric sealant.
- Drill and driver bits: For predrilling and driving heavy-duty screws.
- Tapered wood shims (or composite shims): Essential for leveling and securing the jamb.
- Flexible flashing tape & rigid sill pan: Your primary defense against water intrusion.
- 3-inch exterior-grade screws: To anchor the frame securely through the hinges into the structural framing studs.
- Low-expansion spray foam: Specifically formulated for windows and doors (standard expanding foam will warp your jambs).
- Safety glasses and work gloves.
How to Accurately Measure the Rough Opening
Never buy a prehung door based on the size of your existing door slab alone. You must measure the rough opening (the structural framing behind the trim).

To get accurate measurements, you may need to carefully pry off the interior casing. Once the framing is exposed:
- Measure the Width: Measure the horizontal distance between the trimmer studs at the top, middle, and bottom of the opening. Record the smallest measurement.
- Measure the Height: Measure the vertical distance from the subfloor (not the finished floor) to the underside of the header. Take this measurement on both the left and right sides, and record the smallest number.
- Check for Squareness: Measure the opening diagonally from corner to corner (top left to bottom right, and top right to bottom left). If the two diagonal measurements are within 1/8 inch of each other, the opening is square.
- Check for Plumb and Level: Use your level to check if the trimmer studs are plumb (perfectly vertical) and the subfloor is level (perfectly horizontal).
According to the manufacturer guidelines in the INSTALLATION INSTRUCTIONS for Pre-Hung Exterior Entry Doors (JII106), a standard prehung door typically requires a rough opening that is roughly 3/4 inch wider and 1/2 inch taller than the outside dimensions of the door frame. This provides a necessary 1/4-inch to 3/8-inch clearance gap on the sides and top for shimming and insulation.
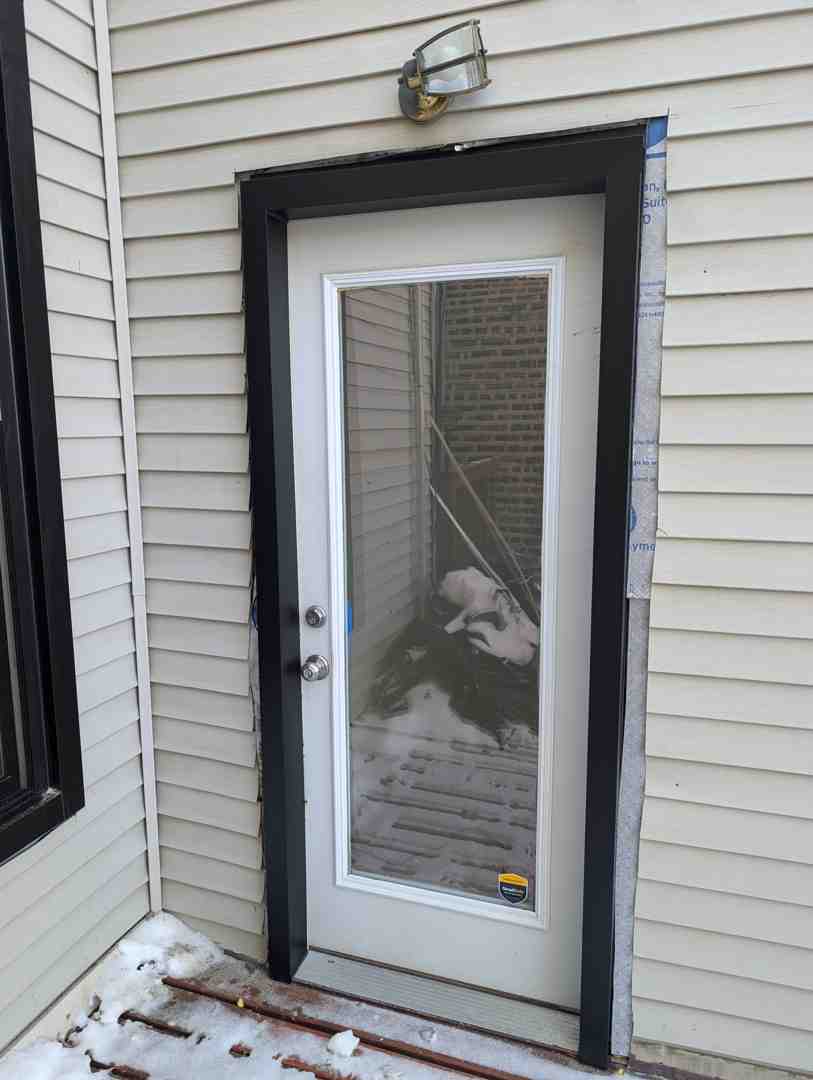
Step-by-Step Guide: How to Hang a Prehung Exterior Door
Now that your tools are laid out and your measurements are verified, it is time to install the door. Follow these steps meticulously to ensure your entryway remains draft-free, secure, and beautiful.
Step 1: Prepare the Rough Opening and Subfloor
Before lifting the new door, inspect the exposed subfloor. It must be completely clean, dry, rot-free, and perfectly level.
If the subfloor slopes, you must level it before proceeding. You can use thin strips of self-adhering waterproofing membrane or beveled wood shims covered by a solid piece of treated wood to create a flat, level base.
Next, prepare your water-resistive barrier (WRB), such as house wrap. Cut the WRB flush with the bottom of the opening, but leave about 1 inch of wrap exposed at the sides. At the top corners, make diagonal cuts about 6 inches up and tape the resulting flap upward out of the way. This allows you to integrate your flashing layers in a “shiplap” sequence so that water naturally sheds downward and outward.
Step 2: Install the Sill Pan and Flashing
Water management is the single most critical factor when you hang a prehung exterior door. Without proper flashing, water will eventually seep under the threshold, rotting your subfloor and joists.
The absolute best practice is to install a rigid plastic or composite sill pan.
- Apply three continuous 3/8-inch beads of high-quality sealant across the subfloor where the sill pan will rest.
- Press the sill pan firmly into the sealant.
- Apply flashing tape over the vertical side jambs of the rough opening, overlapping the edges of the sill pan.
- Apply a generous, continuous bead of sealant along the back dam of the sill pan to prevent wind-driven water from blowing inward under the threshold.
To learn more about modern weatherproofing techniques for entryways, read our Exterior Door Installation Complete Guide.
Step 3: Set, Shim, and Plumb the Door Frame
With a helper, carefully lift the prehung door unit and set it bottom-first into the opening. Do not remove any plastic shipping clips or straps that hold the door closed just yet — these keep the frame square during handling.
- Center the Unit: Center the door in the opening, ensuring a consistent gap on both sides.
- Shim the Hinge Side First: Insert pairs of tapered wood shims behind the hinge locations on the hinge-side jamb. Shims should always be used in opposing pairs to create a flat, solid block that prevents the jamb from twisting.
- Plumb the Hinge Jamb: Place your 6-foot level against the inside face of the hinge jamb. Adjust the shims until the jamb is perfectly plumb in two directions: side-to-side and in-to-out.
- Secure Temporarily: Drive a single 2-1/2-inch screw through the jamb and shim into the framing stud near the top hinge. Do not tighten it completely yet.
- Shim the Latch Side: Move to the latch side. Insert shims to establish an even 1/8-inch gap (reveal) between the door slab and the jamb along the top and sides.
Step 4: Fasten the Frame Securely
Once you have verified that the door is plumb, level, and square, it is time to anchor it permanently.
- Predrill and Countersink: To prevent splitting the beautiful wood or composite jamb, predrill your fastener holes through the jamb at your shim locations.
- Drive Jamb Screws: Drive heavy-duty 2-1/2-inch or 3-inch exterior screws through the jambs and directly through the center of the shims into the trimmer studs.
- Reinforce the Hinges: This is a crucial step for long-term security and to prevent the door from sagging over time. Open the door and locate the hinges. Remove one of the short factory screws from each hinge on the jamb side, and replace it with a 3-inch heavy-duty screw. This screw must pass completely through the jamb and anchor deep into the double studs (the king and trimmer studs) of your house framing.
- Secure the Strike Plate: Similarly, replace the short screws in your deadbolt strike plate with 3-inch screws to provide maximum structural resistance against forced entry.
Step 5: Adjust the Sill, Weatherstripping, and Corner Pads
An airtight seal requires fine-tuning after the door is secured.
Most modern prehung doors feature an adjustable threshold sill cap. If you look closely at the threshold, you will see several plastic or metal screws. Turning these screws adjusts the height of the sill cap.
The Dollar Bill Test: Close the door on a dollar bill placed over the threshold. Pull the bill outward. You should feel firm resistance, but the bill should not rip. If it pulls out effortlessly, raise the sill cap. If it tears or prevents the door from closing smoothly, lower the sill cap.
Next, verify that your weatherstripping compresses evenly when the door is latched. If you notice gaps, you may need to adjust the strike plate or add adhesive corner pads at the bottom corners of the jamb. These pads are essential for preventing wind-driven rain from bypassing the weatherstripping under negative air pressure. For more tips on keeping drafts out, check out Install Door Weather Stripping.
Step 6: Insulate and Seal the Perimeter
With the door securely fastened and adjusted, you must seal the remaining gap between the jamb and the rough opening.
- Insulate the Cavity: Fill the gap around the perimeter of the door frame. We highly recommend using low-expansion spray foam designed specifically for windows and doors. Fill the cavity only about 50% to allow the foam to expand without bowing the door jamb. Alternatively, you can loosely pack fiberglass insulation into the gap.
- Install a Drip Cap: If your exterior trim does not have an integrated metal drip cap, install a rigid head flashing (drip cap) above the top exterior casing to shed water away from the door.
- Caulk the Exterior: Apply a continuous, clean bead of high-quality exterior sealant around the sides and top of the exterior brickmold where it meets your siding or masonry. Crucial Tip: Do not caulk the very bottom of the threshold. Leaving a small weep gap at the bottom allows any water caught by the sill pan to safely drain outward.
For a deeper look at maximizing your home’s thermal performance during a remodel, read our guide on Energy Efficient Door Installation.
When to Hire a Professional Installer
While learning how to hang a prehung exterior door is a highly rewarding project, it is not always a straightforward DIY task. There are several scenarios where calling in experienced professionals is the best choice to protect your home and investment:

- Rotted or Damaged Framing: If you remove your old door and discover structural rot, insect damage, or sagging floor joists, the framing must be structurally rebuilt before a new door can be installed. This requires advanced structural carpentry.
- Masonry, Stone, or Stucco Walls: Installing a door into concrete, brick, or stucco walls requires specialized anchors, custom flashing techniques, and precise sealing to prevent major water leaks.
- Heavy or Custom Configurations: Oversized doors, double doors, or entryways with integrated sidelights are incredibly heavy and awkward to align. Handling these units without professional equipment can lead to injury or damage to the door.
- Warranty Protection: Many premium door manufacturers require professional installation to validate their lifetime warranties. A single DIY mistake can void your coverage.
If you find yourself facing any of these challenges, read our guide on Finding Professional Door Installers Without Losing Your Mind to learn how to choose a trustworthy local contractor.
Frequently Asked Questions About Exterior Door Installation
Can I install a prehung exterior door by myself?
While it is technically possible for an experienced DIYer to complete this project alone, we highly recommend having at least one helper. Prehung exterior doors—especially those made of solid wood, steel, or heavy fiberglass—are incredibly heavy and awkward to lift. Having a second set of hands to hold the unit steady while you level, shim, and drive the initial anchoring screws makes the process much safer and significantly more accurate.
Should I use screws or nails to secure a prehung door?
You should always use heavy-duty, exterior-grade screws rather than nails to secure a prehung exterior door. Screws offer far superior holding power, do not back out over time due to seasonal humidity changes, and allow you to make fine adjustments. If you overtighten a screw and bow the jamb, you can easily back it out a quarter-turn to correct the alignment. With nails, making adjustments after the fact is incredibly difficult and often damages the wood frame.
How do I prevent water leaks around my new exterior door?
Preventing water leaks comes down to proper water management and flashing integration. Always install a high-quality, rigid sill pan beneath the threshold to catch and redirect any incidental water back outside. Ensure your flashing tape is layered in a shingle-like fashion (overlapping from bottom to top), apply premium sealant to the back of the exterior brickmold, and leave a small weep gap uncaulked at the very bottom of the threshold so trapped moisture can escape.
Conclusion
Hanging a prehung exterior door is a fantastic way to elevate your home’s curb appeal, boost security, and lower those monthly energy bills in the face of unpredictable Chicago weather. By following the proper preparation, shimming, and water-management steps outlined in this guide, you can achieve a professional-grade installation that performs beautifully for decades.
However, if you run into structural rot, an out-of-square opening, or simply want the peace of mind that comes with flawless craftsmanship, we are here to help. At Perfect Windows & Siding, we have been serving homeowners across the Chicago suburbs—including Park Ridge, Des Plaines, Morton Grove, and surrounding areas—for over 20 years. We bring unmatched local expertise, custom solutions, and a lifetime warranty on our installations.
Ready to upgrade your home’s entrance with zero stress? Schedule your consultation with us today, and let’s build a beautiful, secure, and draft-free entryway together!