
Is a Worn-Out Door Seal Costing You Money?
An exterior metal door bottom seal replacement is a simple DIY project that stops drafts, blocks pests, and cuts energy costs. If you feel a draft, see light under your door, or notice water or insects getting inside, it’s time for a new seal.
Quick Answer:
- Measure your door width and the gap at the bottom.
- Choose the right seal type (screw-on, slide-on, or brush).
- Remove the old seal.
- Cut the new seal to fit.
- Install the new seal.
- Test for a tight fit.
A worn seal forces your heating and cooling system to work harder, driving up your utility bills. According to Energy Star, properly sealed doors can reduce energy bills by 10-15%. For a small investment of $10 to $50 and less than an hour of your time, you can make your home more comfortable and efficient.
I’m Voytek Glab, owner of Perfect Windows & Siding. With over 20 years of experience helping Chicago homeowners, I’ve seen how this small repair makes a big difference. A new seal is a necessity in the Chicagoland area, protecting your home from our harsh weather.

Replacing your door bottom seal is a small investment that yields significant returns in comfort and savings. It helps maintain indoor air quality, keeps out dust and allergens, and deters pests.
Choosing the Right Bottom Seal for Your Metal Door
When it comes to exterior metal door bottom seal replacement, picking the right product is crucial for a lasting repair, especially in a Chicago winter. Let’s simplify the options.

Door Sweep vs. Door Shoe: What’s the Difference?
A door sweep is a strip of metal or plastic holding a flexible seal (vinyl, rubber, or brush) that mounts to the inside face of your door. It’s simple to install with screws and works well for blocking drafts and dust.
A door shoe is a U-shaped or L-shaped channel that wraps around the bottom of the door. It offers superior weather protection and a cleaner look. For most exterior metal doors in the Chicago area, I recommend a door shoe because it protects the door’s bottom edge from moisture and rust.
Types and Materials for Door Bottom Seals
The material determines your seal’s durability and performance. Here’s a quick rundown:
- Vinyl: The most common and affordable option. It’s flexible and easy to cut but can become brittle and crack in cold weather.
- Rubber (EPDM or Silicone): More durable and expensive than vinyl. It stays flexible in extreme temperatures, making it a great investment for doors exposed to harsh weather.
- Nylon Brush: Excellent for uneven thresholds. The dense bristles conform to surface irregularities to block drafts and pests, though they are less effective against moisture.
Seals are typically held in a rust-resistant aluminum holder. Common designs include:
- U-shaped slide-on seals: Fit into channels (kerfs) on the bottom of many metal doors for an integrated look.
- L-shaped screw-on sweeps: Mount to the interior face of the door, making them easy to install and adjust.
- Brush sweeps: Feature an aluminum holder with nylon bristles that adapt to any surface.
When shopping, check for compatibility. Slide-on seals require matching the kerf spacing on your door (e.g., Pella and Therma-Tru doors have different spacing). For screw-on types, you mainly need the door width.
How to Measure for Your Exterior Metal Door Bottom Seal Replacement
Accurate measurements are key to a successful project. Here’s what to measure:

- Door Width: Measure from one vertical edge to the other. Most exterior doors are 30, 32, or 36 inches wide. The new seal must match this width.
- Door Thickness: Measure the thickness of the door itself, especially for a wraparound door shoe. Most exterior doors are 1¾ inches thick.
- Gap Height: Measure the space between the bottom of the door and the top of the threshold. This determines how far down the seal needs to extend.
- Kerf Spacing (for slide-on seals): If you have a slide-on seal, measure the distance between the grooves (kerfs) on the bottom of the door to ensure the replacement will fit.
Many seals are sold in standard lengths that you can cut to size. However, for slide-on types, getting the kerf style and spacing right is essential. When in doubt, take a small piece of the old seal with you to the hardware store.
Your Step-by-Step Exterior Metal Door Bottom Seal Replacement Guide
Ready to fix that drafty door? Replacing your exterior metal door bottom seal is a satisfying project with immediate results. Follow these steps for a successful installation.
Tools and Materials You’ll Need
Gather your supplies before you start to avoid a mid-project trip to the store.
- New door seal
- Tape measure
- Screwdriver or drill
- Hacksaw or tin snips (to cut metal holders)
- Utility knife
- Pencil
- Safety glasses
- Cleaning supplies (stiff brush, rags, cleaner)
- Pliers or a small pry bar
- Work gloves
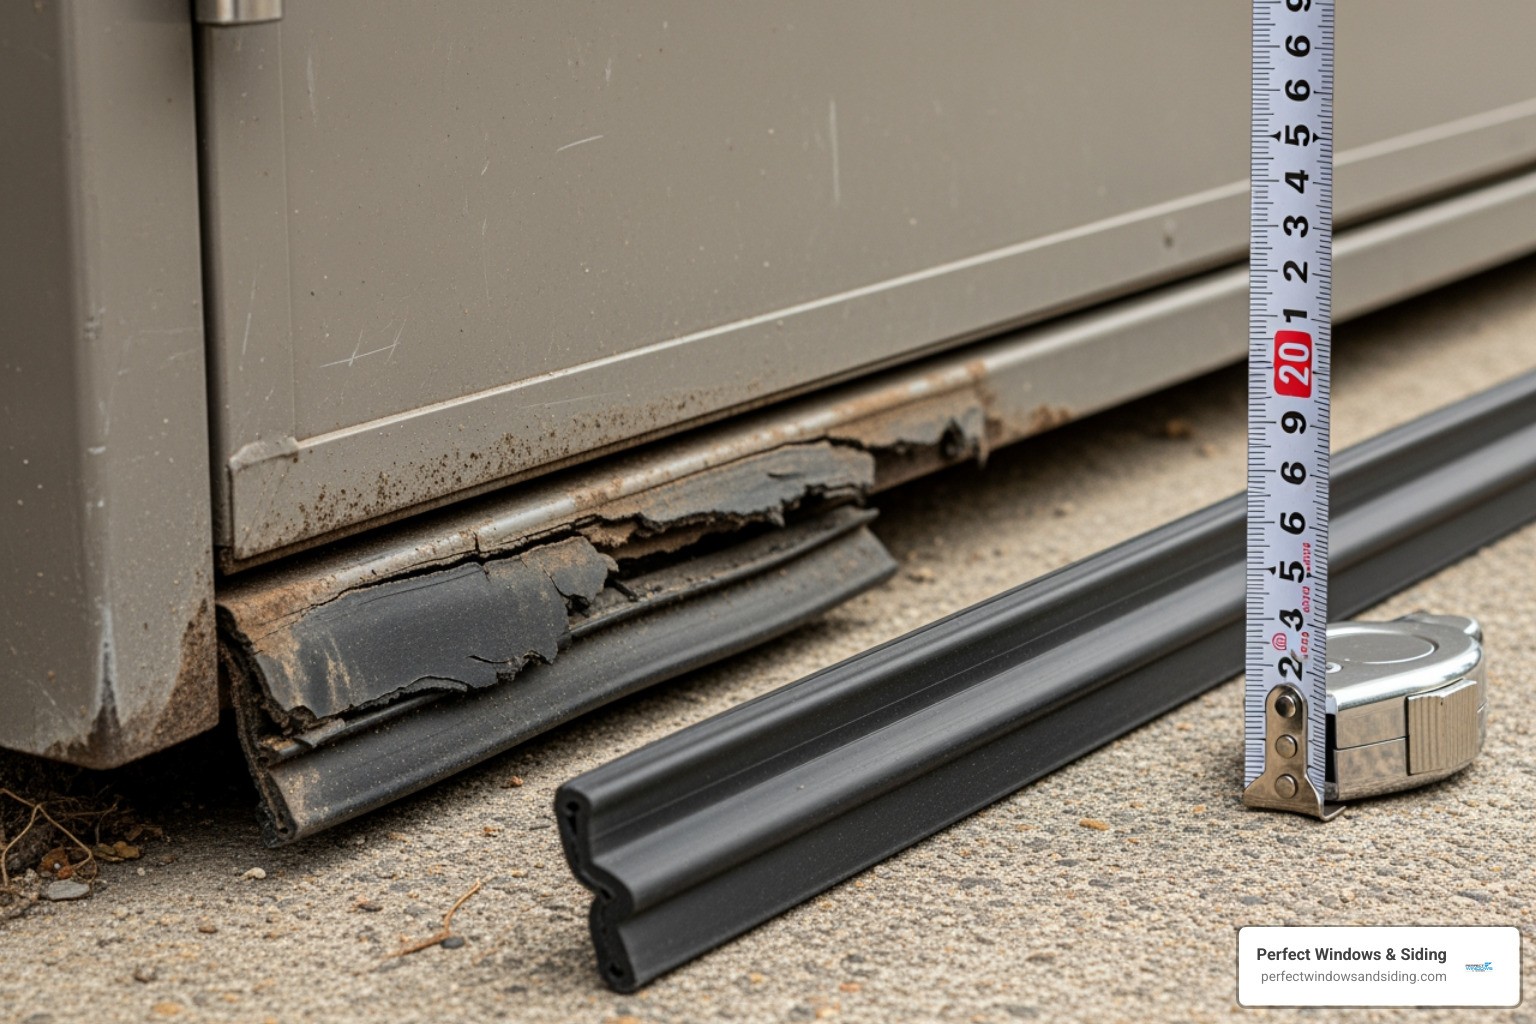
Step 1: Removing the Old Door Seal
This can be the trickiest part, especially with an old, brittle seal. Open the door wide to give yourself room to work.
- For Screw-On Sweeps: Use a drill or screwdriver to remove all the screws holding the sweep in place. If it’s stuck, gently pry it off with a flathead screwdriver, being careful not to damage the door.
- For Slide-On (Kerf) Seals: These are held in channels without screws. Use pliers to grip one end of the seal and pull it straight out. If it’s brittle and breaks, you may need to pull it out in pieces.
Once the old seal is removed, thoroughly clean the bottom of the door and the threshold. Remove all dirt, grime, and any old adhesive to ensure a clean surface for the new seal.
Step 2: Cutting and Installing the New Seal
With the old seal gone, you’re ready to install the new one.
-
Measure and Cut: Hold the new seal against the bottom of the door and mark the correct width with a pencil. Put on your safety glasses. Use a hacksaw to cut the metal holder and a utility knife to trim the flexible seal material to the same length. Remember: measure twice, cut once.
-
Install the New Seal:
- For Screw-On Sweeps: Position the sweep against the door so the flexible portion will press firmly against the threshold when closed. Mark the screw holes, drill small pilot holes if necessary, and fasten the sweep with the provided screws. Start with the screws at each end, then add the middle ones to keep it straight. Don’t overtighten.
- For Slide-On Seals: Align one end of the seal with the channel (kerf) on the door bottom. Carefully push and slide the seal into the channel across the entire width of the door. A rubber mallet can be used to gently tap it into place if needed.
-
Test the Fit: This is the most critical step of your exterior metal door bottom seal replacement. Close the door and check for a proper seal. It should compress slightly against the threshold to block air but not be so tight that the door is difficult to open or close.
Use the dollar bill test: close the door on a dollar bill placed on the threshold. You should feel resistance when you pull it out. If it slides out easily, the seal is too high. If it tears, the seal is too low and creating too much friction. Many screw-on sweeps are adjustable; simply loosen the screws and shift the sweep up or down to get the perfect fit.
Maintenance and Troubleshooting for Your New Door Seal
Congratulations on your exterior metal door bottom seal replacement! A little ongoing care will ensure your new seal performs well for years. Think of it like any other part of your home that faces the elements—it needs occasional attention.
For more general door care advice, see our blog: More info on door maintenance in our Blog.
How to Maintain Your New Door Seal for Longevity
Help your seal withstand Chicago’s weather with these simple maintenance tips:
- Inspect Regularly: Check your seal twice a year (before winter and summer) for cracks, tears, or hardening. Ensure it still makes consistent contact with the threshold.
- Clean the Seal and Threshold: Every few months, wipe down the seal and threshold with a damp cloth and mild soap. Use a stiff brush to clear debris from brush-style sweeps. This prevents buildup that can interfere with a tight seal.
- Check for Proper Contact: Your house can settle over time, affecting the door’s alignment. If you notice a draft, your seal may need adjustment. It should create a snug fit without causing the door to drag.
Common Issues in Exterior Metal Door Bottom Seal Replacement and How to Fix Them
Even with a careful installation, issues can arise. Here are solutions to common problems:
- Seal Drags on the Floor: The seal is too low. For adjustable screw-on sweeps, loosen the screws and slide the sweep up slightly. If you have an adjustable threshold, you may be able to lower it.
- Gap Still Visible: The seal is too high or not fully seated. Adjust a screw-on sweep downward. For a slide-on seal, ensure it’s pushed completely into its channel across the entire door width.
- Seal Cut Too Short: Unfortunately, the only fix is to buy a new seal and cut it to the correct length. This highlights the importance of the “measure twice, cut once” rule.
- Uneven Gaps: This often points to an uneven threshold or a door alignment issue. A brush-style sweep is best for minor irregularities. If your threshold is adjustable, you can try leveling it. For significant gaps, the door’s hinges may need adjusting, which might require a professional.
If you’re stuck, you can find more detailed solutions in our knowledge base: Find more solutions in our HELP CENTER. Don’t hesitate to call a professional if a problem seems too complex.
Frequently Asked Questions about Door Bottom Seals
Over 20 years of serving Chicago homeowners, I’ve answered many questions about door bottom seals. Here are the most common ones.
How often should I replace my exterior door bottom seal?
There’s no fixed timeline; replacement depends on wear and tear. A seal might last one year or up to five. Inspect it annually, especially before winter. Replace it if you see:
- Visible Damage: Cracks, tears, or hardening of the material.
- Poor Performance: You can feel a draft, see light under the door, or notice water or pests getting in.
Chicago’s climate is tough on seals. Basic vinyl seals may last 1-3 years, while higher-quality rubber or silicone seals can last 3-5 years or more. The key is to replace it when it stops doing its job.
How much can I save by replacing my door seal?
The savings are significant. A gap under your door lets heated or cooled air escape, forcing your HVAC system to work harder and increasing your energy bills.
Energy Star estimates that properly sealed doors can reduce energy bills by 10-15%. For an average household, that could mean saving $180-$360 per year. The U.S. Department of Energy identifies weatherstripping, including door seals, as a highly cost-effective energy-saving measure. You can find more details in the U.S. Department of Energy’s Energy Saver guidance on weatherstripping and air sealing your home.
Considering most seals cost between $10 and $50, a replacement often pays for itself in just a few months. Beyond energy savings, you’ll enjoy a more comfortable home with fewer drafts, less dust, and better protection from pests.
Are brush-style sweeps or vinyl fin sweeps better for uneven thresholds?
This is a common question, especially for older Chicago homes.
-
For uneven thresholds, brush-style sweeps are almost always the better choice. The flexible bristles conform to irregularities, maintaining a consistent seal where a rigid fin would leave gaps. They are excellent at blocking dust and pests.
-
Vinyl fin sweeps create a very tight air and water seal on smooth, level thresholds. The flexible fins compress to block drafts effectively. However, on an uneven surface, the fin may drag in high spots and leave gaps in low spots.
The bottom line: If your threshold is uneven, choose a brush sweep. If your threshold is smooth and level, a multi-fin vinyl or rubber seal will provide excellent performance. A simple exterior metal door bottom seal replacement with the right product for your situation can solve nagging draft and pest issues.
Ensure a Perfect Seal for Your Chicago Home
You now have the knowledge to complete your exterior metal door bottom seal replacement. It’s a quick project that makes an immediate difference, eliminating cold drafts in the winter and keeping cool air inside during the summer.
While this is a manageable DIY task for most, sometimes a seemingly simple job can become complicated. An uneven threshold, a warped door, or a hard-to-find seal type can turn a quick fix into a frustrating project. An improperly installed seal can wear out quickly or fail to block drafts, defeating the purpose.
If you’d rather have an expert handle it, there’s no shame in calling for help. At Perfect Windows & Siding, we are a local, family-owned company that has served Chicagoland communities like Wilmette, Hinsdale, and Park Ridge for over two decades. We understand the challenges our climate poses to homes.
Whether you need a professional seal replacement or are considering a full upgrade to our custom steel residential doors or custom iron entry doors, we bring years of experience to every job. We stand behind our work with a lifetime warranty, ensuring your home is comfortable, efficient, and protected.
If you want the peace of mind that comes with professional installation, we’re here to help. Get a professional quote by contacting us and let’s make your Chicago home more secure and energy-efficient.